
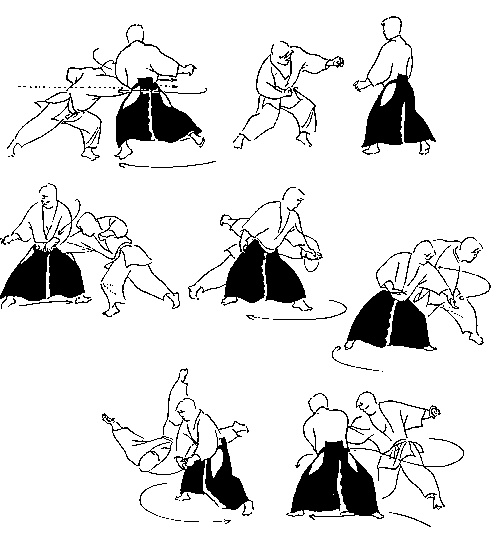
Gyaku hanmi katate dori kotegaeshi can be broken down into its constituent movements.
I am trying to ‘teach to the test’ and therefore present the ‘how to’ step by step mechanics and this morning we built from the understanding of the axis of the encounter.
Gyaku hanmi katate dori eliminates many variables because the encounter starts at a fixed range and a specific amount of pressure. The initial point of contact – uke taking nage’s wrist defines the axis of the encounter. As a teaching exercise nage uses the finger tips of the back hand to press and fold the inside of uke’s elbow whilst closing irimi simultaneously with a half step forward. The exercise is designed to teach nage to leave the initial point of contact alone – suspended in space – and pass it on a straight line. Once the forward movement is complete, then (and only then) does nage take the back leg and pivot 180 degrees. This is a direct entry with a snappy hip movement to accomplish the tenkan. Do not sweep or otherwise create an arc with the back leg.
Now understand what the pressure on uke’s elbow accomplishes. Uke’s strength diminishes and their head lowers and comes forward. As nage enters the back hand that had controlled the elbow can now touch the nape of uke’s neck (a terminal move if desired). Once nage completes the motion, nage’s hips are behind uke’s and nage is cleanly in the shikaku (the dead angle / blind spot).
Once the step by step presentation can be replicated accurately, timing and flow need to be added: kimusubi. Now uke begins to advance and nage matches uke in time. For me the context is clear – nage is advancing with a thrust and uke is arresting the thrusting arm to control it. Keep that context as a subtext. For the exercise, however, as uke advances, now nage places his wrist into uke’s advancing grasp – breaking the OODA loop – which allows for a smooth transition. Uke’s attention should be focused on nage’s wrist, a bit of stage magic, that makes it easy for nage to perform tenkan.
Nage placing his wrist into uke’s hand reminds me of the pebble scene in the 1972 TV series Kung Fu (which is well parodied by Jim Carey): except in reverse. The focus on a single point is what then becomes the point of rotation for the remainder of the action.
There are other tricks to employ. At the moment of contact, nage should make sure to break plane, by lowering deeper into the knees (dropping on the vertical plane). It only need be an inch or two, but if the entire body drops in a unified manner, uke’s entire action is disrupted. This again breaks uke’s OODA loop and nage gains the initiative.
I am slipping in concepts to better illuminate the dire subtleties of irimi-tenkan. (And it is my further contention that there is no tenkan but only irimi-tenkan, but that is an argument for a later post.)
Thus far we have addressed only the lower body movements with an emphasis on allowing the arms to be relaxed from the shoulders and used primarily as reference points only. Now we will employ the arms in a more purposeful manner.
Nage presents the forward hand (remember contextually, this ‘presentation’ is a knife thrust) and uke grasps it. But we are employing more stage magic here – leading uke to the desired action. Nage’s forward hand was mere bait. As uke advances to arrest nage’s forward hand, nage flows it back toward his center whilst the back hand cuts over from a descending high arc to deflect uke’s hand. Now that point where nage’s descending arc touches uke’s horizontally advancing arm meet is the axis. Nage performs irimi-tenkan and at the conclusion uses the original ‘bait’ hand to control uke’s arm.
Arming both players with daggers makes this interaction combatively sensible. What appears to be empty choreography is a deadly dance: nage delivers a thrust as a probing feint that uke tries to grasp (or counter cut), but nage seeing this, counters with the back hand cut (or disarm) to pass uke’s blade and bypass it to deliver another controlling cut once safely in uke’s blind spot. Do not blithely assume ‘basic’ techniques are simple. A better understanding is that they are foundational because they are the most effective in the compendium. Even if the weaponized context isn’t visible at first, keep searching for the analogy because it will be invaluable to your progress.
Putting it all in motion – we get to the position where nage gets to uke’s shikaku in flow – and with nage’s hand over uke’s advanced hand (we remain in a R/L or L/R relationship). The throat of nage’s thumb-pointer finger captures uke’s thumb in order to lead it forward, descending, and on an outward arc. The line drawings from Aikido and the Dynamic Sphere capture the essential flow vectors nicely –
I quibble only with some of the contouring implied given the arcs where there should be lines, but the spirit is true to form.
And now we are to the technical specifics on the hand grab. There are far too many bad exemplars so please be cautious. First a poor example – and one frequently presented –
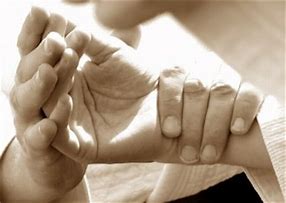
Here are the specifics to never do: (1) support uke’s wrist by bracing the pulse point, which is also where the wrist bends – the very point we want to collapse (2) forget to grasp the thumb, if you do not have uke’s thumb you cannot take the knife and ultimately that is what we are doing! (3) cover finger for finger on a 1:1 ratio, this will at best match uke’s strength where we want to always seek the advantage.
When it comes to kotegaeshi – the turning of the wrist – there are two fundamental approaches: (a) tendon/muscle control and (b) bone/skeletal control. The bone control is the more dramatic because it often concludes with uke taking an arcing high fall. For me, it is more useful because historically uke’s weapon is being used as a fulcrum force-multiplier. Examine and study O’Sensei’s photos from the pre-war era


Clearly this is a bokken disarm, but note how far out of alignment uke’s spine is. Because the bones of the hand are compressed and aligned, those of the wrist are being torqued as a unit, which then has a ratcheting effect that is transmitted through the remainder of the body. Uke is not exaggerating the effect in this photo. This is similar to Wally Jay’s lessons from small circle jujutsu – start with the small bones and small circles to create big impacts. There are details we need to explore in a later post to distinguish when a bone compression is enhanced by uke being forced to retain the weapon, and when nage wants to ensure a clean extraction, but for simplicity sake, the general rule is as follows: once nage takes control of uke’s thumb, starting with the lower three fingers, in order to twist and torque uke’s hand and wrist thusly – which allows nage to then use his free hand to fully cover uke’s tegatana (edge of hand) resulting in uke’s hand turning over their own wrist which structurally necessitates the remainder of uke’s body to follow. A detail from Saito sensei’s books shows the structure of the hand-wrist relationship along with a classical form of atemi.

The tendon control is very effective but far less dramatic. This variant is best applied on an empty (i.e., non-weaponized) hand because one needs to fully compress the tendon of uke’s index finger (and only the index finger). Understanding the muscular structure of the hand shows how the technique effects the body.
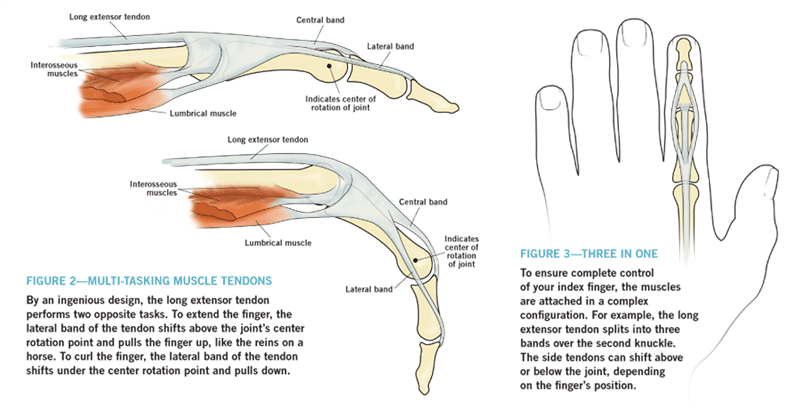
The long extensor tendon is controlled by a complex muscular arrangement, and we merely exploit the connection in reverse – which means we exploit long tendon by compressing it toward uke’s palm to create pain in uke, forcing them to collapse.
There is a danger in conflating and confusing both methods. One must clearly execute either a bone or a muscle control – to do half of each is ineffective at best and places nage in positional danger at worst.
