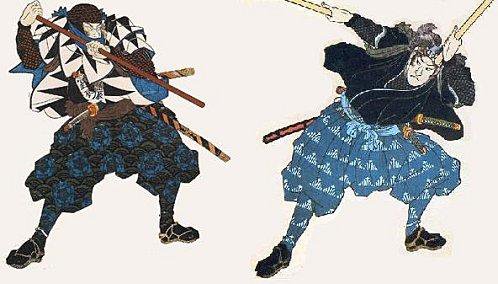
Muso Gonnosuke Katsuyoshi developed the jō from the longer bo staff after his defeat by Miyamoto Musashi. A good retelling of that tale is >here< (An example of learning from defeat: pain as a teacher.)
The use of the jō in Aikido more closely resembles jukendo (bayonet) techniques than it does koryu arts like Shinto Muso-ryu.[1]
Saito sensei preserved, refined and systematized the Founder’s weapons teaching and later innovation by Chiba sensei drew on the constituent movements from the basic patterns to make sansho. Other instructors studied the koryu more directly in order to expand their art and find connections in the movements among ken, jō, and the empty hand. Nishio sensei is a good example. Whatever the path the ultimate goal is to better understand the potential of human motion.
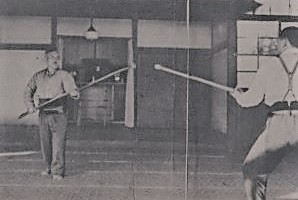
There are any number of systems to learn that will augment your skill with a jō – but they all share basic movements which must be learned as a foundation. The 8-count kumijo is a short path to learn several of the primary motions.
The 8-count kumijo can be done as a solo kata, but in its paired form each player benefits from feeling the weapon to weapon impact as well as learning timing and spacing. The intervals of distance and time are critical elements of every encounter and in this paired exercise both players mirror each other’s movements:
- Junte chudan tsuki
- Cover
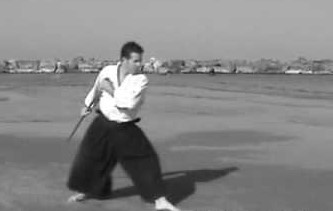
- Yokomen (#1)
- Hasso
- Yokomen (#2)
- Stab to the rear
- Strike leg / block
- Strike hand
Reset to start the sequence again.
Begin in left hanmi and mark the starting position of your feet. At the end of the 8-count sequence you should end exactly where you started.
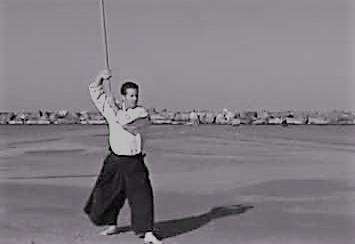
Junte chudan tsuki. Lower your center with your quads and draw the jo back until the tip is nearly hidden by your front hand. Your back foot (R) will reach behind you to lower your hips but your energy will always continue to project forward. When the motion is complete, the jō should be parallel to the floor. Your weight distribution should be loaded to the back (R) foot and your front (L) will be light – akin to nekodachi.*

Your back leg and hand are the power source, your front leg and hand are directional guides. Chudan tsuki is an explosive thrust. The toe of the front foot starts to advance as the back leg (already coiled with potential energy) releases and the back hand pushes the jō forward – the front hand keeping the tip on target. The release of energy is like an arrow being released: the back hand is the released bow string, your legs are the limbs of the bow and the front hand the arrow rest. As the front foot takes its closing advance, the back foot continues to push forward and the back hand starts a curling snap to culminate nails up under the armpit. The back foot then slides to meet the front back (R) instep nearly at the heel of the front (L) foot. The path of the jō is straight but the curling action of the back hand makes the tip spiral – so that at impact with the target it penetrates more easily.
Learning to read the maai is critical. As an instant feedback mechanism, try actually striking a post (pell) it will prove very informative! Even when you strike square and true you will initially be surprised at the amount of force your body must absorb (equal and opposite reaction physics). Strike off target even slightly against a rounded target and your jō will go skidding across and past (leaving your flank murderously exposed). As a thrust tsuki is designed to transfer the most amount of force possible over the smallest surface area to penetrate armor and viscera. The spiral has combative purpose both on entry and on withdrawl.
The spiral on the withdraw leads to your second action.
Cover. The covering action at its most basic is to guard against a yokomen strike. But it needs to cover the entire left flank because you will not know which target level your partner may attempt. Therefore, the cover needs to protect head to foot. As you withdraw your jō from the tsuki, the tip spirals down to your foot as you draw the back hand over your head.

You must sink your body below your rising back hand and turn your hips toward the oncoming strike to receive it with sufficient power. Turning behind your jō also provides more cover. The jō must fully interpose between you and your opponent’s weapon. Your L hand is low enough on the jō to prevent a low line strike from disarming you and your fingers are free enough that a mid line strike will not skid up your jō to dismember them. The lesson here is that you cannot rely solely on your grip and shoulders to block. There is a rolling (camming) action in the jō and your legs will take some of the energy – do not push your jō into the oncoming strike! As a cover there is a great deal to study. Once you have mastered the cover, then learn the bunkai. A block is a strike. The sequence of tsuki to cover can be a dual attack – first the thrust to the belly, then the severing of the Achilles tendon. The cover is spiraling hook to your opponent’s lead leg. Your front hand directing your attack whilst the back hand imparts the spiral energy and raising arc. The budo of Aikido is not at the surface.
Yokomen. From the cover position the top hand (R) slides down while leaving the jō in the exact same place and the low hand (L) crosses in front of your right arm to grasp the top of the jō. The new top (L) hand then snaps down and the bottom (R) hand then arcs to strike your opponent’s temple as you move bodily to the right (your opponent’s left flank). In the paired exercise, if both players attack with precision and determination, each should stop the other’s jō with a single clash. Should you hear multiple bouncing strikes (a tap, tap, tap), then there is a lack of proper energy and control. The crucial lesson is the angle of the attack. Too often yokomen is delivered at a looping angle – too much horizontal action. It should be a snappier acute angle to be a quick downward strike. The lessons from weapons transfer to empty hand.
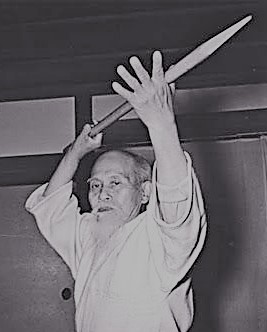
Hasso. From the extended yokomen, slide your top (R) hand forward toward the tip of the jō at least to the midpoint as you use your back (L) hand to pull the bottom of the jō back toward you without changing the position of the angular plane of the jō. The back hand will push the jō down and around with the front hand acting as the ball joint pivot. Simultaneously step your front (R) foot back as you turn your hips. The jō should naturally and briskly invert so your left hand catches the bottom of the jō next to your shoulder line with the jō perpendicular to the ground. This is a clearing action. After your yokomen strike, if your opponent is still in the fight, your lead (R) leg is the closest target. As your enemy strikes at your leg, you must react from an extended position and the return to hasso is when the action between the points is more important than the starting and ending positions. The brisk turn of the jō and hip turning step removes the target and deflects your opponent’s jō in one beat. (The hasso position also protects your upper line from an angle #2 strike whereas the basic cover protects against angle #1. You will see the hasso used effectively as a cover in shansho.)
Yokomen (#2). From hasso your top hand will be thumb down, nails out. To strike yokomen, flip your top hand to thumb up and strike! This second yokomen is delivered from your side rather than your center line. So the action is more similar to a sword strike. The delivery in the kumijo has the same ‘bounce’ test as the first strike. The slight difference here is this strike has less of a fulcrum action and more of a squeezing closing of the grip at impact.
Stab to the rear. From the extension of yokomen, now an opponent is closing at your back. Look over your rear (L) shoulder to spot your opponent’s lead foot. Without changing the angle or plane of your jō, use your top (R) hand to drive your jō into your opponent’s foot using your back (L) hand as a stabilizing guide and final source of power. Leave your hands in their final position. Your top (R) hand should be thumb and nails toward your face and your lower hand (L) should be thumb away from you. You should be grasping the top third of your jō.
Strike to the leg. Your stance remained R leg forward as you stabbed the opponent at your rear. This allows the opponent to your front to strike again to your forward leg while your attention momentarily focused to the rear threat. Quickly step into the strike using your jō to either block the oncoming strike, or to hit your opponent’s lead leg first. The result here and the precise footwork is contingent on maai and speed. For kihon waza purposes step forward with the back (L) leg and pull your lead (R) leg offline and behind you. You are now in hidari hanmi (L). In the kumijo both players have blocked the low line strike to the leg, so there is tension at the bottom given the jō to jō contact.
Strike to the hand. Because your hand position has not changed, and because you must maintain dynamic tension with your opponent’s jō, your bottom (L) hand should be pushing toward your opponent, while your top (R) hand pulls toward you. The L hand is a fulcrum and your R hand is using the longer end of the lever. This is a brief moment in time however, since your next move, once you recognize the impasse of the jō to jō contact, is to flip the jō and break your opponent’s hand. The low (L) hand is now the ball joint and as you release the top of the jō from your R hand, augment the energy by snapping your L hand nails to the heavens which will rapidly bring the top of the jō to the back of your opponent’s hand.
Reset. From the final strike to the back of your opponent’s hand, perform a withdrawing slide with your jō now parallel to the ground, hips low and ready to perform junte tsuki. Find your starting mark. You should be in left hanmi with the toe of your left foot touching the initial starting point.
Eight basic moves that cover a good number of the potential motions with the jō (Chiba sensei defines 36 basic movements). Study these movements. They are there to inform your understanding of the universal patterns of motion. The spirals that are thrusts with a jō are found in the rising block of karate’s jodan uke. That same camming action provides the additional shearing force for irimi nage. The hand flip used in count #8 is the same action as kotegaeshi. The rising cut to the Achilles (movement #2) will result in the body position used to throw koyuho. Cognate motions and positions show the way to discovering universals.
_____________________________
GLOSSARY
Chūdan (中段)
Middle line of the body. The primary target and defensive band in Count 1.
Chūdan Tsuki (中段突き)
Middle-line thrust. The opening initiative-taking movement (Count 1).
Hasso (八相)
Rotational clearing posture; removes the leg and restores centerline (Count 4).
Hidari-Hanmi (左半身)
Left-foot-forward stance. Used in reset and leg-strike recovery.
Jō (杖)
Four-foot staff.
Jōdan-Uke (上段受け)
Rising block. Referenced in universal mechanics (not as a counted movement).
Junte (順手)
Standard overhand grip used in chūdan tsuki (Count 1).
Kamae (構え)
Guard posture. Appears implicitly in stance transitions.
Kata (型)
Formal sequence; the 8-count is a principle-extraction kata.
Kumijō (組杖)
Paired jō practice.
Maai (間合い)
Interval of time + distance. The backbone of all eight counts.
Migi-Hanmi (右半身)
Right-foot-forward stance.
Neko-dachi (猫足立ち)
Cat stance. Initial lower-body loading for tsuki (Count 1).
Yokomen (横面)
Diagonal cut to the temple. Applied in Counts 3 and 5.
Tsuki (突き)
Generic thrusting action. Appears in both forward and rear thrusts (Counts 1 and 6).
_____________________________
[1] Jukendo – the use of the bayonet as the foundation of Ueshiba’s jō should be rather obvious: In his pre-war manuals he taught battlefield techniques. Refer back to this post for broader context and compare Col. Anthony Biddle‘s bayonet with Ueshiba’s juken-jutsu, they are contemporaries and all militaries at that time had a bayonet curriculum.

2 thoughts on “8 COUNT KUMIJO”