JOINT CONTROL

Any martial artist must study the use and limitations of the body; its structure and mechanics – and specifically its joints. (The banner image shows the major synovial joints of the skeletal system.)

In Aikido, we are principally concerned with the control of the opponent’s “center” but the techniques achieve this by working from the outer joints toward the inner joints:

[Fingers] -> Wrist -> Elbow -> Shoulder -> [Hips] -> Neck / [Head/Spine]

I [bracket] those parts of the body that are used but not always given the primacy of focus that they merit. The joints of the lower body, foot, knee, to hip are subject to the same manipulation as the upper body, but they are not the primary focus of Aikido.

Fingers/Wrist

The fingers are not explicitly discussed as often as they should be. Aikidoists usually discuss the tekubi (wrist) as if nikkyo/sankyo/kotegaeshi were just “wrist” manipulations. The progression starts small bones to larger bones.

Phalanges to metacarpals

Nikkyo as a wrist lock only works when the thumbs are aligned so as to compress the metacarples and the power of sankyo is amplified when the phalanges (fingers) are captures and torqued. Kotegaeshi as a proper knife strip must control the thumb first before the turn of the wrist. And knowing that the wrist is a condyloid joint (a limited hinge) allows us to manipulate the elbow through the wrist by applying pressure along uke’s shyuto during the throw.

It is important to know that the hand is holding the weapon and therefore a critical target to manipulate and disable.

Even in a nuke fight

During our warm-ups, we self-manipulate our wrist joints. Too often this becomes a rote activity, done so often it becomes perfunctory and devoid of real value. Slow down and really manipulate your body to learn to better manipulate others.

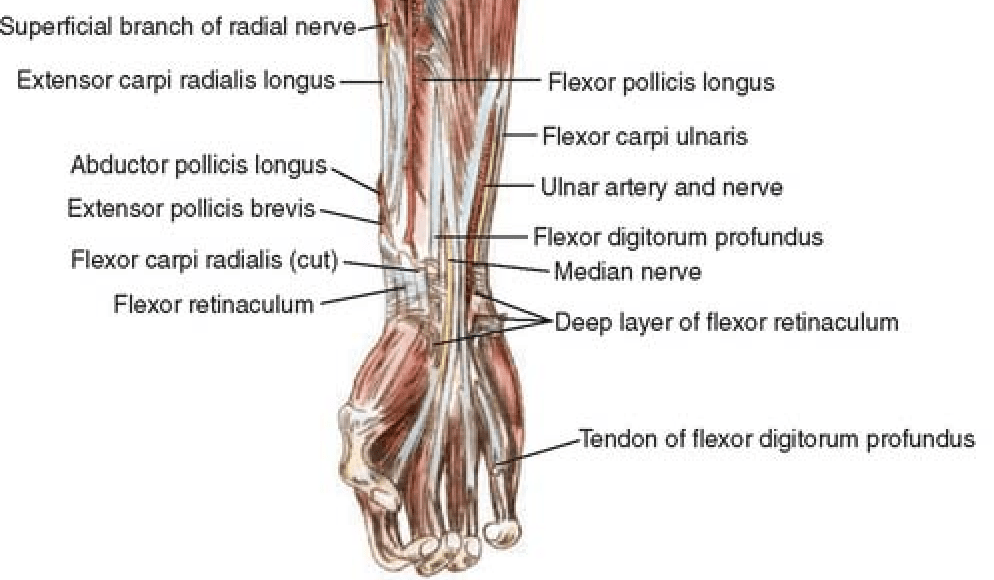
Ikkyo – compress your wrist joint tightly, fold your fingers to your inner forearm, yes, but then isolate the fingers while the wrist is bent to compress them individually. Can you get your thumb to touch your inner forearm? Feel how your index finger is more painful to compress – that is the extensor indicis proprius (EIP) tendon.

Nikkyo – fully grasp your own hand to compress the metacarpals and position them 90-degrees from your own wrist and only then crank them, little finger leading, toward your nose. You should feel a strain in the muscles in your forearm and your elbow should lock. Lock small joints to control larger ones closer to the core.

Sankyo – this is the clearest example of small bones locking to control larger ones. While we usually grasp palm to palm so our controlling hand had thumb around tekubi and fingers around the opposing thumb, try grasping your fingers instead and then applying the outward torque. You should feel your fingers lock wrist then wrist lock elbow to then drive the forces into your shoulder.

Chiba sensei 1991 – look at the finger lock lead
ubi (fingers) first
finger lock transition

Yonkyo – is a nerve and tendon manipulation foremost, but it requires a torquing action on the wrist to expose the median nerve and make it easier to manipulate.

Nerves and tendons

Any yonkyo’s failsafe is to crank the wrist in a two-handed grab to lock the elbow, brace uke’s shoulder on your lead knee and then drive into uke’s shoulder for the control.

Gokyo – requires the same hand control and manipulation that nikkyo does, but it is taught as a gross-motor, stop-hit first. Neglect the hand control at your peril.

The fingers are the key to wrist control, and the wrist is the key to locking the elbow.

Elbow

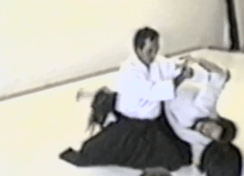
The elbow, or hiji is a primary target for Aikido. Both hiji-kime-osae and ude-kime-nage name the elbow explicitly, but the anatomical target of shiho-nage, ikkyo’s pin, figure-4 locks are all the elbow. Lock and break the elbow with a direct force against the hinge and the arm is rendered combat-ineffective.

any arm bar

With longer two-hand weapons like the sword and spear, the elbow is relatively inert when compared with one-handed blade use. In pugilistic arts, the elbows are direct extensions of the body structure and act to transmit power from the spine to the hands via shoulder/hip rotation. Likewise, manipulating the opponent’s elbow creates a direct path back to the the head/neck/spine via the shoulders.

I have covered ikkyo in several posts to cover aspects of this ‘basic’ technique but here it is important to see ikkyo as an elbow manipulation because it is an accessible contact point, proximate to the body and below the threat of uke’s weaponized hand. The intercepting contact with the forearm is really a stop-hit at the triceps to better access the elbow in order to take uke’s balance and control them.

Understanding how the elbow is manipulated, we should learn how to defend against – or limit the exposure – we have in the offense. The shape of the ‘unbendable arm,’ exercises like hiriki no yosei and the jodan blocks in karate all emphasize the connection between the elbow and the core.

Koichi Tohei made physiology mystical

The physiology is simple: keep your elbows ‘soft’ (don’t lock them, keep a slight bend at all times) and keep your armpits closed. As soon as your elbow breaks the horizontal plane, it will be used against you to control your balance.

The offensive use of knees and legs are not part of the overt curriculum in Aikido, but note that your elbows and knees are essentially the same joint type. And where the elbows connect to the upper body to spine (center), the knees of course connect to the lower body in the same manner. Therefore, they can be used to disrupt the hip line and the opponent’s spinal integrity from the bottom up.

It is also vitally important to understand how knee alignment is to effectively transfer power from the hips; and not just for muscular transfer from kicks, but also for delivering upper body strikes, throws and fa jin projections as well. The knees and feet should point in the same direction and be aligned the the top of the sacrum to allow for maximum rotation and energy transfer from the feet into the spine via the hips. We keep this connection by use of the sliding step (suriashi) and by flexing bodyweight onto the balls of the feet by bending the knees and pointing them into the target.

Shoulders/Hips 

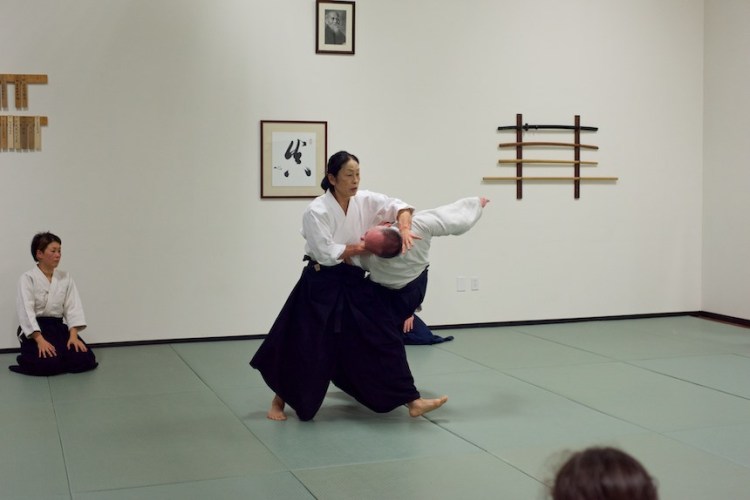
The shoulders and hips are identical ball joint structures on the high and low lines and are responsible for transferring power from the spine to the extremities (arms and legs). As such, learn to use your peripheral vision tuned to the shoulders/hips to read your opponent’s intent and respond accordingly. Stay ahead of your opponent’s OODA loop! Aikido teaches that the hips are the body’s primary driver of momentum and power generation.

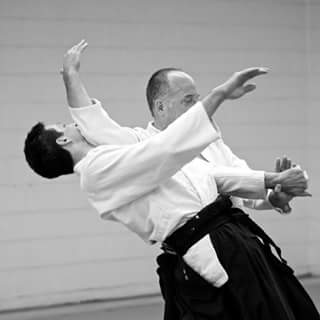
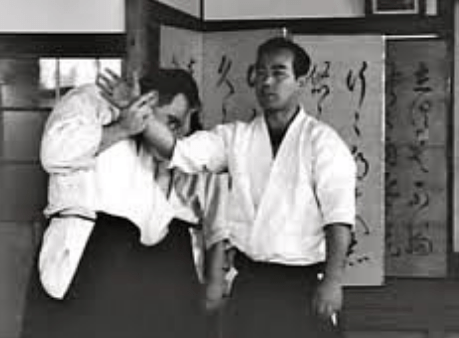
The shoulders are a key area of focus, both offensively (in using a sword) and defensively. A simple example is counter-yokomen, where nage strikes to the front of the shoulder to check the opponent’s arm while entering. The vast majority of Aikido’s locks and controls are applied to the shoulder in order to dislocate it or to secure the lower arm and weapon.

Entering to control the shoulders and hips is done to ‘control the center’ and more honestly, to get easier access to the head/neck/spine.

Head/Neck/Spine

The head appears to be an easy target, but it is encased in bone (skull) designed to protect the brain. While weapon strikes to the head (especially heavy blunt force) can be very effective, closed-fist strikes will usually do more damage to the assailant unless they know precisely where to strike. There are soft tissue targets on the head, such as eye sockets/temples and ears, but these are small targets and we all move our head reflexively to protect them. If, however, you have properly moved up the chain, locking hand to elbow to shoulder to gain access to the head, neck and spine, you now have several handholds (ears/hair/eye sockets/mouth) that are easy to grab and manipulate. Polite Aikido ignores most of these natural handholds, but the bunkai of irmi nage will still employ nerve control on the mastoid.

dig those fingertips in!

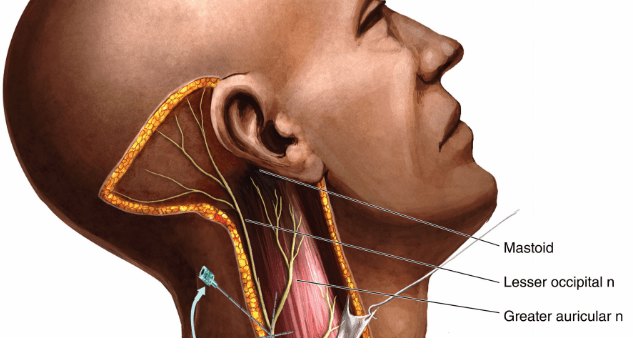
The neck is the most vulnerable part of this chain since it is without a protective bone structure such as the ribcage and skull, so the soft tissue and nerves are exposed and vulnerable to direct manipulation or attack.

For the spine, it is usually well protected by muscles of the back and can be hard to attack. The tailbone is a notable exception and can cause disruption through the whole spinal chain when damaged. This can be done using strong, direct knee strikes or also by causing the opponent to land heavily when sitting down backward from a sweep or drop.

_____________________

This article should be reviewed in conjunction with Human Frailty as well as Will To Win, both of which review physiology, and Thrusting Triangle which shows proper targeting, all of which takes place within the box containing our larger vital organs bracketed by the four points of both shoulders and both hips.

GYAKU HANMI PROGRESSION

A class outline for progressive techniques from static gyaku hanmi katatae dori

Gyaku hanmi katatae dori: what is it? A hand grab. Why? Uke stop-hits a thrust, taking control of nage’s knife hand. From the grab, each player needs to match extension to create the dynamic tension necessary for a static encounter.

Nage’s focus is on tension-release. Solve the basic problem of moving around the fixed point (axis) of the encounter. The basic (kihon) resolution is tenkan.

From tenkan how does nage extract the knife/free the grasped arm? By simply raising his arm like bringing a sword to jodan. Nage needs to keep his arms close to his center and with a slight camming action of the grasped arm – from knuckles to the mat to shyuto to the mat – while raising the sword to jodan. Two variations here on footwork (ashi-sabaki): last night I demonstrated a simple slide entry rather than a full irmi-tenkan, both are possible. From jodan, turn the hips toward uke’s center then drop your arm for kokyu stretch.

The bunkai (application) is to grasp uke’s obi (belt) with the free hand and then break the back over your knee by driving the grasped hand down over the neck. In polite Aikido grabbing the obi facilitates leading uke’s center forward. As uke, keep your belly muscles engaged, do not simply “limbo” through the stretch. If nage raises their arm, advance toward it to keep contact (don’t create a gap); when nage lowers the arm, keep positive pressure against it. Any gap in contact is an opening to strike: close the spaces to avoid atemi.

From the stretch, a breath throw is possible: kokyu-ho. I demonstrated both the basic and the dynamic variation which replicates the sword raise to an immediate turning cut. The important body mechanics are the same however: from the grab, slip to the flank while allowing uke to keep the initial grab, raise your sword, turn your hips back toward uke’s center, drop your arms heavily and dynamically straight down (cut with your sword) as you advance with your hips through uke’s position. The throw is a physical displacement of uke’s body augmented with the arms – the arms must break the balance (i.e., manipulate uke’s jaw/head) but the impelling force is from nage’s lower body and hips.

Progression: from kokyu-ho to kokyu-nage. If uke is resolute in their contact, or starts a reversal, nage must solve that new problem. Uke does not allow nage to raise to full jodan extension and keeps their weight forward, so nage now must change vectors. Do not continue to go through uke (against their weight) but rather find the path of least resistance and go with the flow – so execute a snappy turn of the feet, blend with the incoming force (face the same direction as uke) and throw forward. Nage’s arm movement is a cut down and I demonstrated with a bowie-knife trainer to make the camming action of the arm visible. Nage executes a C cut (from migi-hanmi [right] and a reverse C from hidari [left]). The final position of nage’s arm is shyuto toward the sky with a positive (forward extension) energy toward uke.

The tanren-geiko (body development) version requires solid connection to the mat and deep muscular action in the belly. To provide a fluid image, I then moved to ki-no-nagare presentation – a “two finger” throw. This is a visual presentation to show the dynamic fluidity of the motion. From a distance (increase maai) uke approaches. Nage presents two fingers to ensure lighter contact and flows in a continuous motion, drop weight (break uke’s balance), blend, raise, cut. Same principle motions now just done for continuity of motion – capture the timing to effect the throw.

Then back to more body development. What if uke holds on at the terminal motion – isn’t thrown? Uke starts to turn back to continue the fight, so nage has a new problem to solve. Before uke can punch with his free hand, nage must slip to the flank, grasp uke’s hand that is controlling nage’s knife hand and free it. This is otherwise called, gyaku-hanmi ikkyo. The ashi-sabaki is key to avoiding uke’s counter punch – don’t stay in a horse-stance where your nethers are exposed to uke’s snap kick. As you move off line, keep your grabbed hand low as you cam it from palm up to palm down, rotating against uke’s thumb. As uke’s thumb is exposed, break the clutch with your free hand – ensure your counter-grab is thumb over thumb. As you strip uke’s grasping hand you need good hand strength to compress uke’s metacarpals and rotate the small bones away from your center, which causes uke’s elbow to lock (bone-locking!) and rotate up. Facilitate all this with dynamic physiology – move your body toward uke and you can use your forward shoulder to augment the power of your counter-grab/stripping hand. If your hand strength is insufficient to rotate uke, then you need to use your full body weight to advance, compress uke’s hand against your shoulder/clavical and force uke’s elbow up.

Once you see the elbow point-up to the sky, that is the key. Nage uses their newly freed hand to eagle-claw uke’s elbow and cut straight down in order to continue the lock into uke’s shoulder. From there – execute the pin – inside knee to the ribs, shoulder driven straight down to damage the bursus, keep uke’s arm as vertical as possible. Then inside knee down, outside knee/thigh used as a brace point and as you advance to kiza, forward pressure with the outside knee to keep uke’s arm above the line of their shoulders. Nage should still have a firm/compression grab on uke’s hand which must be manipulated shyuto down toward the mat. Remember the key is uke’s index finger to make the pin effective! This ikkyo pin (flat on the mat) more closely resembles nikkyo’s hand control.

But what if uke is too strong to drive through to execute ikkyo? Making sure that you retained solid control over uke’s grasping hand, keep the rotation on and slip to uke’s rear – nage’s chest slides along uke’s back. This requires split coordination. Nage’s controlling hand leads uke away (and rotating) while nage’s free hand thrusts forward and leads nage’s bodily advance to uke’s rear. Imagine a fencer’s thrust, the limbs are moving in opposite directions. Nage’s goal is to get his free hand to uke’s neck. The counter ikkyo leads to irimi-nage.

get low!

From uke’s rear, nage can firmly grab uke’s neck – pressure points and mastoid muscle, then with a turning drop, bring uke to the ground. From there, nage can exert neck control, but as uke raises to escape, nage remains “in the pocket” behind uke to execute a throw (strike to the jaw). The polite Aikidoist will ensure that nage always maintains a close control on uke’s neck – firmly attach it to nage’s shoulder – so that the throw is a rotational control and not a strike. Nage’s arm appears to windwill for the throw, but that is to avoid the live edge. Nage is using the false edge to trap and throw rather than decapitate.

thumb down, shoulder relaxed, throw by advancing

Gyaku-hanmi -> kokyu stretch -> kokyu ho -> kokyu nage -> ikkyo -> irimi nage.

Just one possible progressive technique sequence to demonstrate the dynamic nature of Aikido.

AI and Totalitarianism

The BBC reported Google’s DeepMind has been defeating world-champion human competitors in Go and Chess – all without knowing the rules of play prior to the engagement.

In 2016, we introduced AlphaGo, the first artificial intelligence (AI) program to defeat humans at the ancient game of Go. Two years later, its successor – AlphaZero – learned from scratch to master Go, chess and shogi. Now, in a paper in the journal Nature, we describe MuZero, a significant step forward in the pursuit of general-purpose algorithms. MuZero masters Go, chess, shogi and Atari without needing to be told the rules, thanks to its ability to plan winning strategies in unknown environments.

DeepMind website

This is an impressively scary development in computing intelligence from IBM’s Deep Blue. Learning game theory and defeating humans at strategy games is just one aspect of AI, another is understanding natural language as developed by OpenAI. What does the Turing Test mean in an age when millions of people are falling in love with an AI chat-bot?

Science fiction has admonished us to beware the dangers of artificial intelligence – the creation of a machine intelligence that will surpass our own and often concludes that we are unnecessary.

Adrienne Mayor, however, provides compelling evidence that technological advances have been historically and universally used most effectively to solidify totalitarian rule (see the related observation in Privacy).

The thesis of her Gods and Robots (2018) is summarized in this lecture for the Long Now

Gods and Robots

The advance of technology appears inevitable and (after a brief Luddite opposition) is widely embraced as a good thing. It makes life easier. But easier isn’t the same as better.

Wall*E Life of Ease – Disney shows the truth!

The human species needs stressors and challenges – without gravity muscles atrophy quickly, loading the skeletal system keeps bone density higher, the brain craves information, stimulus, and problems to solve. Biologically we need to strive against and toward.