RANGES OF COMBAT

For all its elegance, Aikido is not a Ryū -流, – a complete art. Its formal curriculum lacks a full set of techniques at every range – maai “interval.” This is a simple observation, a discussion of fact, not a normative evaluation of its merits.

Like most traditional martial arts we are discussing contact range – close quarters combat. Meaning, the combatants are within the orbit of the human body. A true Ryuha would need to have all battle field ranges, and therefore include training in the use of rifle, bow and arrow, javelin and other skirmisher weapons; training for different terrains; siege weapons; in short the art of warfare. Modern martial arts specialize in monomachy (L. monomachia < Gk. monomakhia, from monos ‘alone’ + –makhia ‘fighting’).

As a generalization, Aikido at its most dynamic specializes in the kicking range. Ironically, Aikido has a paucity of organic tools at kicking range because of history. The metaphor in Aikido is that the techniques are ‘like’ or ‘based upon’ sword and spear, therefore the presumptive range of engagement is greater than that of a ‘naturally’ unarmed art. The beauty and flow of the Aikido derives from its origin from older arts that assume armored and weaponized engagements. Battlefield engagements assumed a spear, katana, or tanto. As such, the specific angles of attack, targets, and ranges are circumscribed by the history of the art. This is not an indictment, but rather an explanation of the techniques in the curriculum.

However, sticking to a sclerotic understanding of the art – an assumption that the art is the compendium of its techniques only results in a self-imposed (and limited) understanding of the principles of motion. For our purposes, at close-quarters-combat there are the general four ranges to consider with the tools at each range:

RangeTools – body / [augmented]
Kicking RangeFoot / [sword]
Boxing RangeHands, fingers / [dagger]
Trapping RangeHead, teeth, shoulder, elbows, forearm, hand, knees, shins, feet / [folder]
Grappling RangeTeeth, arms, legs / [folder]
Tabulated generalizations

Please remember these are concepts and therefore generalizations. As a general rule – the longer the range, the fewer organic tools available. As the range closes, more elements of the body can be deployed, until we get to grappling range, when the possibilities again begin to diminish.

One can quibble over the specifics, but in broad strokes there are arts that specialize at each range (e.g., Tae Kwon Do at ‘kicking’, Western boxing at ‘boxing,’ etc.). This is not to circumscribe an art but rather acknowledge a tendency to specificity. Hence the need to look to those arts that more readily express a systemization across all ranges – or more simply to look for universal lines of motion that work at any and all ranges and across multiple types of mechanical tools (aka weapons).

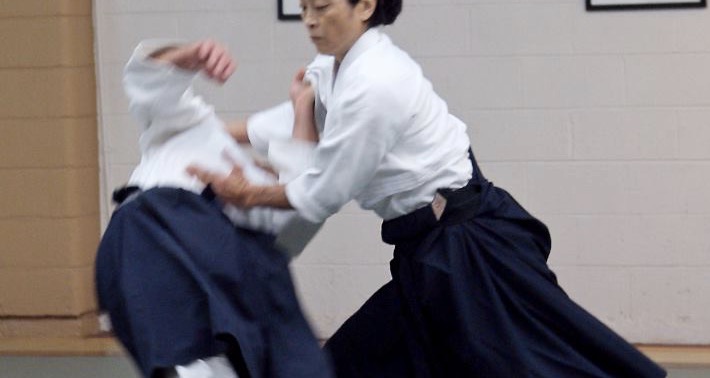
This morning we continued to explore kata dori. Starting with the kihon presentation of kata-dori ikkyo‘s entry to practice the ‘box step’ pattern of in (atemi), flank (draw), enter.  This is the beginner’s range – teaching precise movements and eliminating variables.  Please note, however, that this presumes a static encounter – starting a grappling range where the expression of movement is at its greatest number of possibilities, but we select a very specific (delimited) response for ease of training.

We then moved to kicking range – the ‘advanced’ presentation where the grab is intercepted before contact is made. The elegance of Aikido is expressed here because the range allows us to focus on ki-musubi – the harmonizing of action between uke and nage.  As uke enters for the shoulder/lapel grab, nage can perform a leading ushiro-tenkan movement while deploying a palm strike that flows naturally down to the grabbing hand’s elbow as a control point. Last class we worked the nuances of the shuyto and the camming action – and all those lessons still apply. From this basic line, we then started to explore a five-count response.

As tori approaches for the kata-dori (or jo-dan tsuki) attack, nage executes an ushiro-tenkan movement while (1) executing a palm strike to elbow control (2) then a back knuckle with the same hand, which will cause tori to react – as the head moves away, tori’s grabbing arm will naturally raise, allowing (3) nage’s free hand to move from low-line to control tori’s elbow and then a quick 2-beat where nage then (4) replaces his hand control on the elbow and (5) the newly freed hand then performs a femoral strike.  (A great visual reminder of the principle as shown by Tissier sensei on a three-beat at about 2:35)

We then moved back to a trapping range presentation. This time, as tori approaches for the grab, nage enters irimi – a step with the back foot into the approaching arm. The challenge is to continue to face tori with your torso while the lower body (waist down) enters at an angle – this is a brisk move – a stop-hit. I also showed this irimi action as a kick with the advancing leg to tori’s lead leg. Done properly it is invisible to tori and highly effective: done forcefully, it will destroy tori’s knee while you simultaneously execute a cut to tori’s arm or neck (whichever is closest). This pattern is really no different from the five-count at kicking range. Merely an advance to close and ensure effective trapping vs the ushiro tenkan to absorb at kicking range.

Icon_CombatType

Master Keating made the following observations about knife fighting specifically but it applies to ranges in general:

Most styles of knife fighting have some sort of footwork as part of their overall instructional format. For the most part knife men are ambitious, active and always on the move. It’s the nature of the game. To some observers a knife man’s footwork when seen in action can appear to be “nervous” or “flinchy”. Well, duh… it IS a knife fight after all! So indeed one gets a little jumpy and reactionary in such a situation. The price for being too complacent could be serious injury or death! We hear such ancient axioms as “a moving target is harder to hit” and “attacks made while in motion are harder to detect by the opponent”. Yes, all true. Most men fight this way because it comes naturally, it is all they know, instinct and fear are their mentors! It keeps them alive and that’s what counts. The trained knife man uses advanced principles along with his natural instincts!  This makes a truly impressive package of defense. 

The footwork and body mechanics of the long range methods are different from the footwork and body mechanics of the close range fighter. Long range is mostly a side-fighting method like fencing (little physical pressure). Close range is head on, squared up to the opponent like a football player (American football) (heavy physical pressure). Learn to shift in and out of ranges. Adjust body mechanics and footwork accordingly. Be able to click in and out of the “killer instinct” mode that Vu used to speak about. He wrote a book too. Be able to adjust to that path of behavior as part of the range changes.

______________________________

Vu = Paul Vunak

Understand the ranges!

KATA DORI

A new month so moving to a new focus: a front shoulder grab – kata dori. First the context. A shoulder grab while wearing a dogi (or Edo-period clothing) can be an effective control. Starting with the little finger one quickly wraps his grip in the fabric of the shoulder or upper sleeve to effectively pin the opponent’s arm or at least provide a solid purchase for taking the balance. This grasp is a brisk attack, a control then a destabilization which could be followed by a strike with the free hand (kata dori menuchi). However, done with vim and vigor the shoulder grab could become and effective attack – imagine pulling the opponent straight down into an object. Whatever the scenario, kata dori requires a prompt response.

Given a proper attack tori has already taken out the slack which thereby creates the necessary tension. Momentarily allow uke that point. Without moving the shoulder or telegraphing, take a stabilizing step back which simultaneously counter’s tori’s pull and keeps the tension so that from this new deeper base (farther from the point of contact) you can now draw your shoulder back with a hip rotation. Simple tanren development and a good way for both players to develop a sense of rooted, grounded connection that forces balanced development. Once the stability and hip strength is understood, then we add the arm.

First the kihon-waza. Assume nage presents left shoulder which uke obligingly grabs with his forward (right) hand. Leaving the shoulder in place, nage steps forward with his right leg and delivers an atemi, then with uke distracted/stunned, nage moves to the flank with his left foot whilst the right hand moves from the atemi down the brachial to the uke’s biceps with constant contact and forward (i.e., toward uke’s hara) pressure to deliver a ‘camming‘ rotation with the ulna. All this while drawing the grasped shoulder back. Lots of vectors to follow, but the ashi-sabaki (footwork) is a simple ‘box step’ and the arm pattern is just drawing the sword (iaido). The lessons from tanren training are the stability and sequencing of the feet (establish position, then deliver torque) and iaido should remind you that the saya moves as much as the sword does (i.e., the grasped shoulder is critically important to keep moving in the opposite vector as the ‘striking’ hand).

The typical point of failure is that most people pull uke toward them, push uke’s arm down or otherwise forget to perform a rotational camming action and fail to move their shoulder away from the action.

The bunkai should be obvious insofar as uke’s initial aggression is immediately stopped with a strike to the face then a rapid disengagement of the grab and a follow up strike. Should uke maintain the grab, then the flow of action will bring them down and directly in front of nage. But all this presumes an ill-trained opponent.

An opponent who is better trained will ‘follow’ the action and thereby close the distance (or if nage struck, will intercept the strike, thereby forcing kata menuchi). This moves us to the slightly more advanced line of play whereby nage rotates to the inside line (ushiro tenkan) rather than the basic ‘drawing’ move. This action will often drop uke’s head down and in front – a kaiten-nage-esque move. If you imagine a Spanish Circle or any basic 8-direction figure – such as:

Cutting rose
Geometry in action

The footwork is increasing in complexity because the path of travel is greater and timing (ki-musubi) is now of critical importance. The basic footwork (with nage in left hanmi) is, right foot from E to A, then left foot from C to G. However, the more advanced would require left foot ‘sweeping’ from G to C while right foot advances pressure from D to H and perhaps culminating its move from H to G. In the kihon-waza, uke remains at A, but in the more advanced, tori has started on the A-E vector only to move to C-G because of the dynamic tension of the technique. But again, all this presumes a specific encounter wherein both players assume the shoulder grab is of paramount importance.

o sensei diagram
The geometry keeps recurring

Most of Aikido’s beauty is the flow of the encounter – the visual ‘dynamic sphere’ that is created when both practitioners are adhering to the logic of the scenario. This ‘suspension of disbelief’ allows the ‘advanced’ flow where in tori attacks with the intention of kata dori, nage matches the rate of uke’s advance by drawing tori forward and intercepting the grasping hand many techniques become possible. However, rather than work off a presumed grasp, tonight we played the attack with the possibility that the kata dori could be a jodan tsuki and later, a double dagger. Change the assumptions of the scenario and the movements become more abrupt.

Because a tsuki or a dagger thrust rapidly closes the distance, nage must move first off the line and close just as rapidly to counter the attack – strike that which moves first. The play here is to trap the dagger against the opponent who would (should) be retracting to re-load for another strike. The angles will be unfamiliar at first because the distance is much closer than a “normal” Aikido attack. If you play the ‘normal’ Aikido line (with a drawing retreat or ushio tenkan), you will find a cunning adversary will attack your newly vulnerable side with his free hand. This bit of devious reality from a knife-fighter’s game wherein the opening move is mere deadly bait to elicit a response that assures tori of the kill stroke. So the counter to pin the assailing arm with the ‘basic’ camming action but this time at an angle to return the first knife to the attacker’s center, then to use the powerful hip turn to force their secondary weapon off line – because you have controlled and rotated the opponent’s spine. This is controlling uke’s center.

Once turned, the assailant’s original offending hand is now across nage’s chest, so a quick upward strike to the hyper-extended elbow, followed by a rapid strike to the groin, then the head allows for a much discombobulated uke to be thrown ude-kimi nage, shihonage, kote-gaeshi: take your pick. It wasn’t the throw but rather the concept of the set-up that we were working on tonight.

We will be exploring kata-dori because it automatically puts us in ‘trapping range.’ This is close in-fighting range. All our natural weapons are available to us and we must be able to contend with them all. Tonight we started close, then moved out, only to move in close again. Shorter range, faster timing, fewer visual signals. Work here for a while and then the longer ranges will seem slow – time expands again and your options increase. The brusk movements are necessary developmental tools that should allow you to better understand the flow and connections of the longer ranges. We must learn to play them all.

KUBOTAN

Kubotan Techniques for your library: download the PDF.

Who is Takayuki Kubota? >here<

What is a kubotan?  A small hand-held impact weapon that is used as a “force multiplier” in order to facilitate locks and nerve plexus strikes.  There are numerous historical and cultural precedents – yawara, kongou (vajra), tessen, shobo, pasak, etc.

The techniques illustrated are by no means unique but do serve as additional examples of basic controls and strikes that are widely taught and employed.

What is the practical application?  Palm held multipliers are easily concealed and therefore ideal for self defense.  However their prevalence and recognition makes it more difficult to carry them legally so please be sure to check local laws.

Use a kubotan – Silat Suffian Bela Diri

Additional related resources:

Stick Fighting by Masaaki Hatsumi is another good reference manual.

Well considered applications and thoughts from Don Rearic.

Yawara Stick resource page >here< by TiRod Tactical.

Purchase a “stinger” by James Keating from the source >here< or from >Amazon<

Pete Kautz’s very important overview on How to Use the Comtech Stinger is found >here< and excerpts from it are copied below for ease of reference.

_________________________

The Comtech Stinger Self Defense Tool
By Pete Kautz

Stinger Self Defense Tool History

The Comtech Stinger Self Defense Tool was designed by Master at Arms James A. Keatin based on a 19th century push-dagger that he had seen while researching the martial history of old New Orleans.  Jim immediately saw the utility of such an item and devised a modern version made of lightweight high-strength injection-molded plastic.  Designing his tool along the same lines, the Stinger Self Defense Tool protrudes between the top two fingers to focus the entire force of a punch into a tiny area about the size of a pencil’s eraser.  Unlike the push-dagger of old, the Stinger Self Defense Tool is only meant to cause shock of impact and is thus a less-than-lethal striking option.

Stinger Self Defense Tool Colors

One interesting aspect of the Stinger Self Defense Tool is that they have been produced in numerous colors over the years such as red, yellow, green, blue, clear plastic, clear blue, and even clear purple (Laci Szabo’s Miami Beach model) in addition to good old black and tactical gray.  While black is always a tempting choice for most guys, the diversity of color adds to the Stinger Self Defense Tool’s invisibility and utility for today.

What do I mean?  Simply that a black one looks like a weapon, while a clear plastic (ice) or clear blue (blue ice) look more like a normal item upon quick examination.

S.T.I.N.G.E.R. 7-Point Safety Checklist

For the untrained person, simply holding the Stinger on a keychain at “key” transitional times (house to car to office, etc.) can act as an anchor to remind them to PAY ATTENTION to what is happening around them.  I advise newcomers to self defense to do this whenever they touch or even think of the Stinger for the first few weeks they carry it, and it makes it a safety habit so in their minds Stinger Self Defense Tool = Pay Attention To What Is Happening!

What should you pay attention to?  To make it simple, we’ve used the word “Stinger” to create a basic 7-point check list.  There are more of course, but this is a start to get the untrained person thinking about these issues.  (Readers here doubtfully need a reminder of the basic color codes of awareness or other such principles but can probably appreciate it when dealing with family members, friends, and so on.)

S – Surroundings – What’s going on around you?  A bar, a subway, the street?
T – Time of Day – Early morning, afternoon, 2 am, when?
I – Intuition – If something “feels wrong” then pay attention!  Trust yourself on this and act!
N – Neighborhood – Where are you?  Someplace you know or not?  How sketchy?
G – Groups – Whether formal (gangs, sports teams) or informal (bar patrons), groups act differently than individuals.  A big group of rowdy drunk women usually just means bad tips for the bartenders where a big group of rowdy drunk guys could mean watch out.
E – Exits – What are the exits from any room or area you enter?  Is there only one or are there more?  Who is between it and you?
R – Reactions – Unusual reactions from people to normal situations can indicate trouble.  If someone is wearing only shorts in December, gets unusually friendly or skittish, or flips out about something trivial then watch out.

So, if you run through the S.T.I.N.G.E.R. list and say “Hmmm…I’m at a party at 2am in a neighborhood I don’t know and have a funny feeling about this group of guys who got all quiet then were suddenly irritated after I walked into the room – you know what – IT’S TIME TO GO via through the side door over there!”  Given that 7-point checklist failure, only a fool would stay, right?  Obviously, this is an exaggerated example but I’m sure you get the idea.

Basic Grip

The Stinger Self Defense Tool is properly held between the top two fingers of the hand.  This allows the thumb to lock down on the side of the fingers and secure the grip.  It also promotes the same body mechanics as if you were firing a traditional punch with the top two knuckles of the fist or the ram’s head as it is known in some styles.  Whether striking with the fist in a vertical Chinese manner, with a partial twist, or with a Japanese full twist this is a strong grip and will help protect your hand.

Some people, especially those with large hands, may instinctively grip the Stinger Self Defense Tool between the middle two fingers.  However, while this can also work, it is not the preferred method as it does not promote correct striking mechanics or allow for a secured grip on the Stinger Self Defense Tool.  Try both in the drills and see

Buy Pete Kautz’s Stinger Training Videos