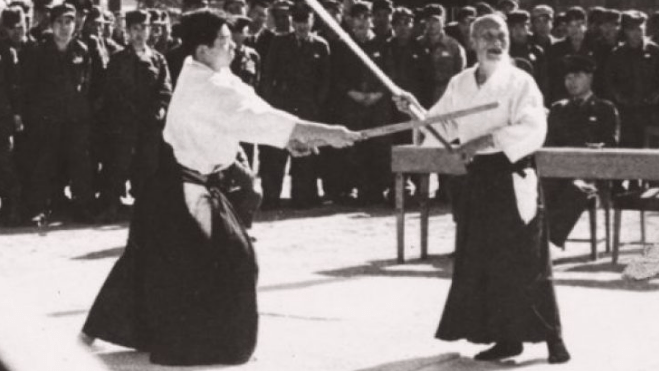
1st KUMITACHI

Initial Conditions

Both practitioners begin in migi-hanmi, seigan-no-kamae.

Neither possesses initiative. Both share the centerline equally, each capable of attacking or receiving without commitment.

Uchidachi then deliberately lowers the sword into gedan-no-kamae.

This is not defensive withdrawal. It is 誘い (sasoi) an invitation.

By voluntarily abandoning the upper line while preserving posture, distance, and balance, uchidachi presents an apparent opening to men while concealing the intended response.

Ukedachi accepts the invitation by raising into jōdan-no-kamae.

The tactical decision has already been made. The strike itself merely follows.

This form isolates a specific problem: induced overextension.

In practice, this condition usually arises through error. Here it is created deliberately so that it can be studied.


Count 1: Invitation
Problem

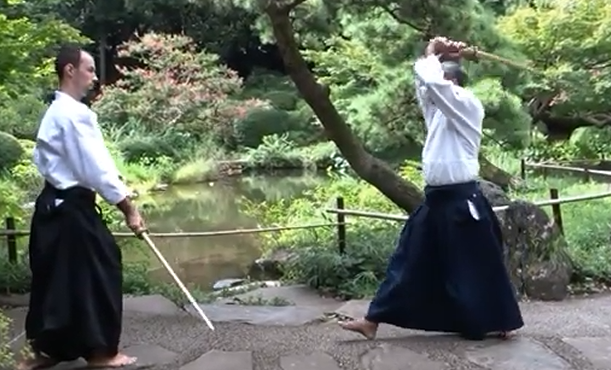
The invitation has succeeded.

Ukedachi has accepted the offered line and commits to a descending shōmen strike.

Although ukedachi attacks first, uchidachi has already shaped the conditions under which that attack occurs ABD, attack by drawing.

The contest for initiative has begun.

Ukedachi Logic

Commit fully.

A hesitant strike teaches nothing.

The apparent opening must be exploited decisively.

The commitment is genuine, but so is the structural exposure it creates.


Uchidachi Logic

Cut upward (kiri-age) into the opening to strike the underside of ukedachi’s wrists, as Ukedachi completes shomen.
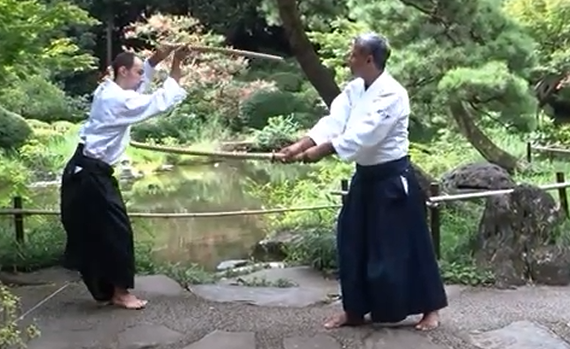
This is not defensive; it is opportunistic exploitation.


Principle

A real opening must be given for a real response. Without risk, there is no pressure. Without commitment, there is nothing to study.


Count 2: Displacement (Ukedachi retreats + cuts down)

Problem

Uchidachi has taken initiative.

Ukedachi must now recover while moving backward.

This is already a disadvantage. Behind the OODA loop. Ukedachi is now reacting rather than dictating the exchange. The exchange has shifted from attack to recovery.


Ukedachi Logic

Step back (left foot), to receive the descending cut with uchi-komi.
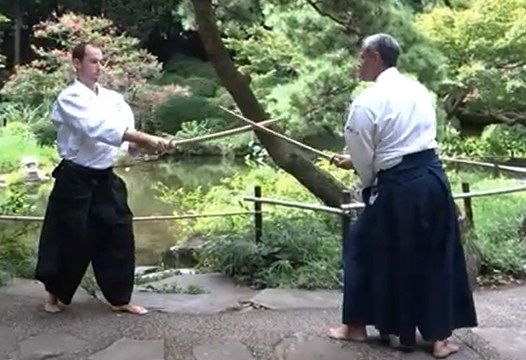
This is not a counterattack: it is recovery and line reset.

You are stabilizing structual posture and alignment.


Uchidachi Logic

From the apex of the kiri-age, re-orient the blade edge, and continue forward, maintaining pressure with a descending cut toward ukedachi’s wrist from the top.

Do not overextend or chase blindly. Your job is to keep initiative alive.


Principle

When initiative is lost, structure must be recovered before advantage can be regained.


Count 3: Tsuki Attitude (Ukedachi reorients)

Problem

Ukedachi cannot remain defensive.

Pure retreat leads to collapse.


Ukedachi Logic

From the uchi-komi capture, adopt tsuki kamae and perform kiri-kaeshi. Kiri-kaeshi emerges not as a reset, but as the only remaining path to recover initiative.
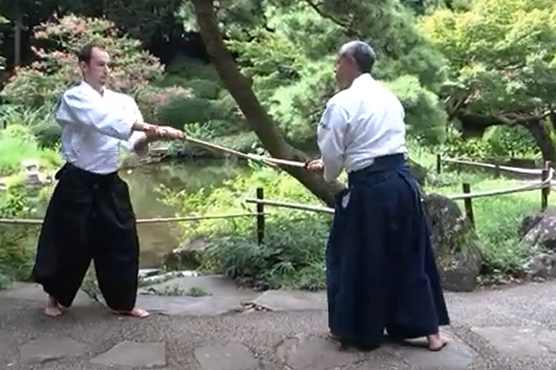
This is critical: You shift from retreat → threat re-establishment.

Even if you are behind, you must present danger.


Uchidachi Logic

Ukedachi is trying to capture initiative. Sensing the threat and change of pressure, release the bind and rise naturally into jo-dan no kamae and deliver shomen.
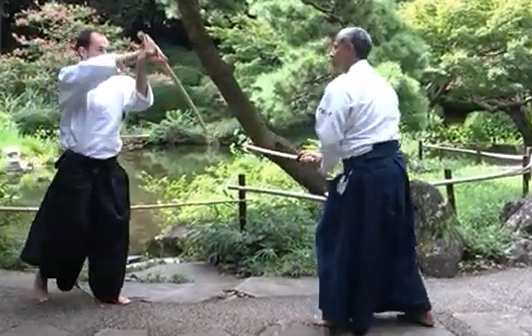

Principle

Even in disadvantage, you must remain offensively credible.


Count 4: Final Exchange

Problem

Both are now advancing. The exchange has narrowed to a single contested line.

This is where most interpretations collapse into choreography.


Ukedachi Logic

Uchidachi has released from the kiri-kaeshi bind. Structurally, you are behind.
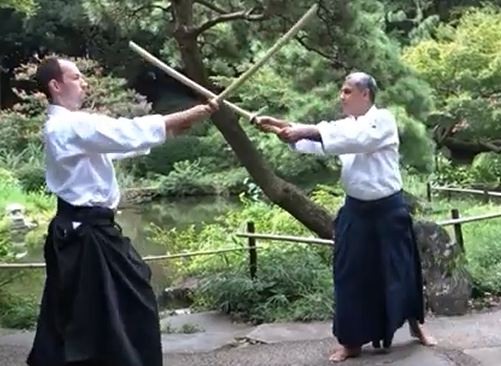
As uchidachi delivers his shomen, orient toward the center and kiri-otoshi directly.

The cut does not block.

It resolves decisively.


Uchidachi Logic

Recognize the instant of release.

The moment contact disappears, so does information.

From the kirikaishi rise into jōdan and execute shomen.
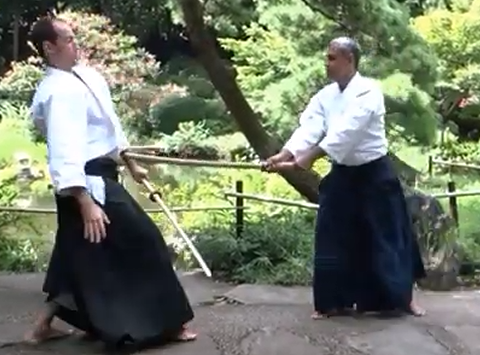

Principle

The winner is not the first to attack.

The exchange remains contested until the final instant. Victory belongs to the practitioner who resolves the contest by occupying the centerline decisively.

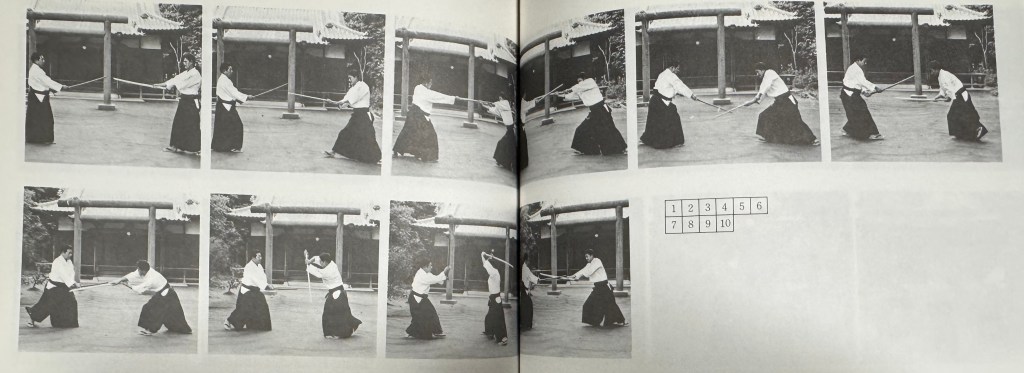
This also is a refinement by Chiba sensei of Saito’s original presentation.

Traditional Aikido Vol 2, Advanced Techniques, Morihiro Saito, pp 24-25

The key distinction is uchidachi’s conclusion: to drive through with renzoku uchikomi versus Chiba’s kiri-otoshi. The distinction is pedagogical.

Saito concludes with renzoku uchikomi, continuous, driving pressure. The final cut does not guarantee victory because structure degrades, timing slips, and both practitioners remain present. Under those conditions, the only thing that matters is the ability to continue without collapse.

Renzoku uchikomi is uninterrupted viability. Do not stop. Do not disconnect. Do not assume success. The fight does not end when you believe it should. It ends when continuation is no longer possible.

Chiba ends all kumitachi with kiri-otoshi. Not as flourish. As doctrine.

Where Saito allows the exchange to continue, Chiba imposes a demand: at some point, continuation is failure. Pressure alone is not enough. Persistence, without resolution, becomes evasion. Kiri-otoshi is not simply a cut. It is the refusal to remain in uncertainty. Chiba is not more aggressive. He is more absolute.

Done without proper intention and orientation, renzoku can degrade into mechanical continuation, chasing without control, pressure without conclusion. The practitioner never finishes.

Kiri-otoshi demands: precision, timing and structural dominance. But if you miss the moment there is nothing behind it but collapse. Kiri-otoshi provides clarity, you cannot hide your failure. Chiba sensei refined the kumitachi for pedagogical clarity.

Ultimately, renzoku assumes the fight continues. Kiri-otoshi denies that assumption. Saito teaches how not to stop. Chiba teaches that, eventually, you must.

The lesson I take from Chiba sensei’s refinement is: at some point, continuation is failure. Or in my voice:

You cannot win by defending

There must be: a moment of truth, a final line, a decision, and he imposes that across all kumitachi by adopting the same conclusion: kiri-otoshi.
Credit for video and still shot captures: Mihaly Dobroka

4th KUMITACHI

This is aiki-ken. It assumes coherence: both players recognize initiative, distance, and line. Real encounters do not grant that clarity. Entries will be broken, timing will be stolen, and the first mistake will often be the last.

The 4th kumitachi teaches a specific response to a thrust. A straight thrust can be decisive, but it is also the most dangerous moment in kenjutsu: you are extended, your weapon is compromised, your opponent is structurally intact.

A koryū critique would hold, if maai and timing are correct, the first tsuki ends the exchange. But this is not presented as kenjutsu, though it borrows from its constraints and consequences. It is not modeling combat outcome. It is modeling: connection under pressure, continuity through failure, sensitivity to line and timing. The sword makes error explicit.

The lesson is not how to win, it is how not to disconnect. And what to do once a disconnect if felt.


Initial Conditions

Both in migi-hanmi, chūdan-no-kamae (seigan-no-kamae)

Ukedachi lowers to gedan-no-kamae.

This creates an opening from the midline for the opening thrust – an opening that is also a trap.

Count

#1 – Chūdan Tsuki

#2 – Suppression / Line Break

#3 – Hidari Tsuki (uchidachi recovery)

#4 – Men / Kiri-Otoshi (decisive finish)


COUNT 1: Chūdan Tsuki

Problem

Because the maai is already established at close range, whoever owns centerline first can end the exchange.

Ukedachi Logic (Initiator)

Initiate with a direct tsuki to the trachaea. The kissaki is vertical and delivered as a thrust without telegraphing – a JKD “straight blast”

The structure is extended. That is the cost of initiative.

Uchidachi Logic (Receiver)

Do not block. Allow the blade to rise slightly, receiving the thrust on the belly of the sword, then redirect with a camming press-check downward.

The body shifts slightly off-line as the blade rotates from ukedachi’s outside line to inside line.

You do not beat the weapon; you change its path and orientation.

At the base of the press, your sword is on top: structurally dominant.

Principle

Initiative creates exposure. Control of line immediately becomes contested.

COUNT 2: Suppression / Line Break

Problem

Ukedachi’s thrust has failed and now is controlled downward.

If uchidachi resists, structure collapses and the exchange ends.

Uchidachi Logic (control phase)

Maintain pressure, but do not overcommit.

The goal is not to win the bind, it is to force the opponent into a predictable recovery.

Overextension forfeits control.

Ukedachi Logic (recovery begins)

Do not push back. Do not resist or try to reclaim the line through strength.

Instead: allow the downward pressure to continue, continue to maintain connection to feel blade position and pressure, and at the bottom of the press, release the bind and immediate hanmi change.

The sword drops, but the body reorganizes.

Principle

The moment you fight pressure directly, you lose both structure and time. Yielding preserves optionality.


COUNT 3: Hidari Chūdan Tsuki

Problem

Ukedachi has lost the original line and is momentarily exposed.

Recovery must occur before uchidachi converts control into a finishing cut.

Ukedachi Logic (recovery attack)

Shift to hidari-hanmi and re-enter on a new line.

Deliver a second chūdan tsuki from the opposite side toward uchidachi’s kidney.

This is not a reset, it is a continuation from a broken structure.

The power is identical: rear leg drives, hips align, back hand delivers

But the geometry has changed. You are now attacking from outside the original line of suppression and the blade is now flat (parallel to the ground), more lateral; a different problem for uchidachi.

Uchidachi Logic (adhesion + counter)

Retreat and absorb the thrust with uchi-komi. Do not disengage: adhere.

From this connection, initiate kiri-kaeshi to the thumb.

This is the moment of maximum opportunity.

If the timing is correct, ukedachi is cut here.

Principle

If the line is lost, change the line. If connection is maintained, opportunity persists.


COUNT 4: Men / Kiri Otoshi

Problem

Ukedachi has reasserted attack, but uchidachi has already initiated a counter (thumb cut). Both lines now exist simultaneously. Whoever controls the final line survives.

Ukedachi Logic (commitment to resolution)

Do not disengage prematurely.

Maintain connection just long enough to read uchidachi’s riposte, keep forward pressure and connection long enough to sense the extension, then release and step through immediately to jo-dan no kamae to deliver a decisive men cut.

The sequence is continuous. No reset. No chamber. The cut is not added: it is revealed through continuity of motion.

Uchidachi Logic (Kiri-Otoshi decisive)

As ukedachi releases to cut, recognize the moment of disconnection. The void signals danger. So, align vertically into jōdan-no-kamae and cut directly through center with kiri-otoshi. This line does not block or receive; it redirects through alignment and dominates the center.

Ukedachi’s cut is collapsed at the moment of expression.

Uchidachi’s timing is later but the structure is superior. Uchidachi enters in go-no-sen and resolves in sen-no-sen; not with speed, but through structural dominance.

Ultimately, kiri-otoshi arises not from seeing the attack, but from sensing the inevitability from the release.

Principle

The moment of release is the moment of greatest danger.

Final initiative is not owned: it is proven through line control.


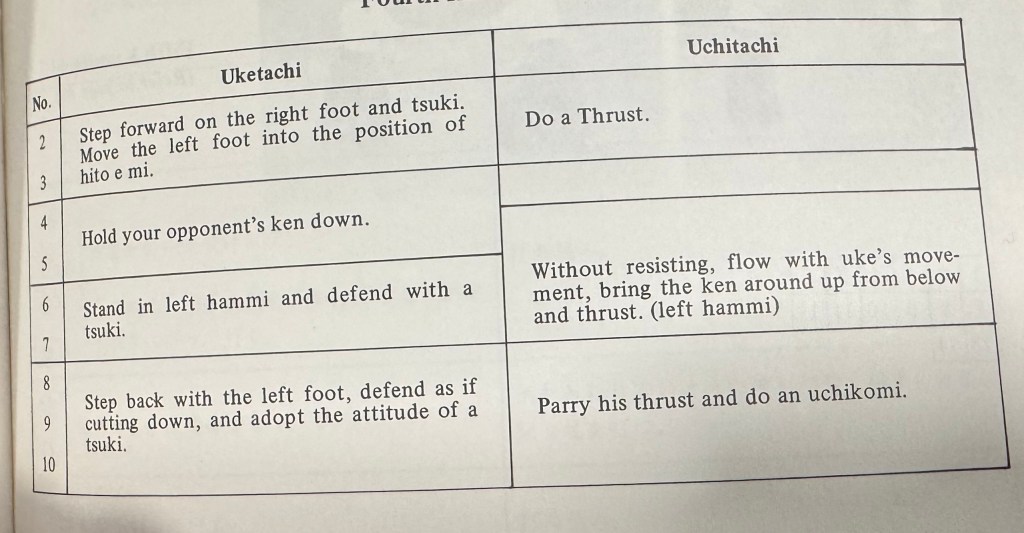
This presentation of the 4th Kumitachi is an evolution from Chiba sensei who was taught the forms by Morihiro Saito. Saito sensei’s presentation is slightly different:

Traditional Aikido Vol 2, Advanced Techniques, Morihiro Saito, pp 32-33
Native parsimonious pedagogy

As presented by Saito, this is a compact instructional sequence: thrust (tsuki); suppression (press down); non-resistance (flow); line change (hidari tsuki); resolution (uchikomi). It is intentionally minimal, designed to be learned physically, not explained conceptually.

Chiba sensei expanded the pedagogy, and I have refined it further with the logic of bunkai (targeting purposefully).

Viewed attentively, the initial thrust is not just an attack, it is a necessary overextension. Loss of center is built into the form and the practitioner must operate from a compromised position and in a time deficit.

Because weapons are involved, the maxim, “Do not resist” is not philosophical. Key principles of Aikido emerge as somatic lessons: Resistance = structural collapse; Yielding = preserved awareness and optionality

The exchange is not broken between counts. Continuous contact enables: pressure sensing, timing recognition, and correct re-entry to the center line.

And the single most important lesson is: release is loss of information, therefore exposure, and it demands immediate action.

Saito’s version resolves with uchikomi. Chiba’s refinement introduces kiri-otoshi as structural conclusion – and he concludes all six kumitachi with the same sequence.