KIHON – IKKYO AND NIKKYO

It has taken the entire year for me to actually start a more systematic presentation of the kihon waza, which was my goal in January. And so it goesIkkyo through yonkyo – the first through fourth techniques.

Gyakuhanmi katatedori sets up the encounter. We focus on nage and the count.

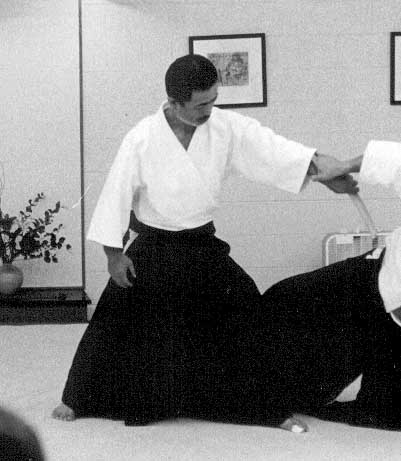
  1. Step with the back foot to strike atemi. The feet are parallel and nage is square to uke.
  2. Nage’s striking hand now flows to uke’s elbow to destabilize ukeNage simultaneously draws the grasped hand with the front foot 90-degrees to the flank.
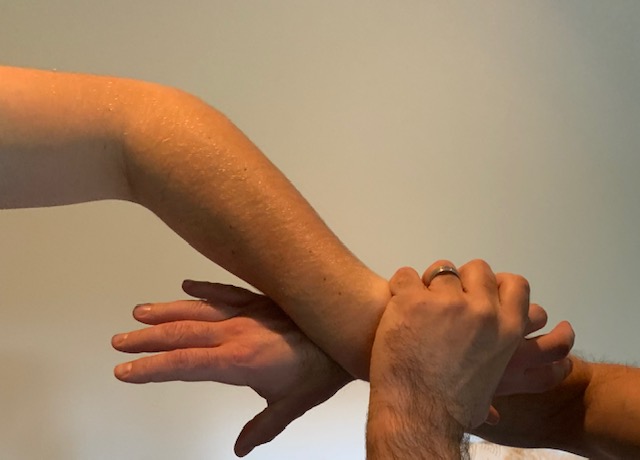
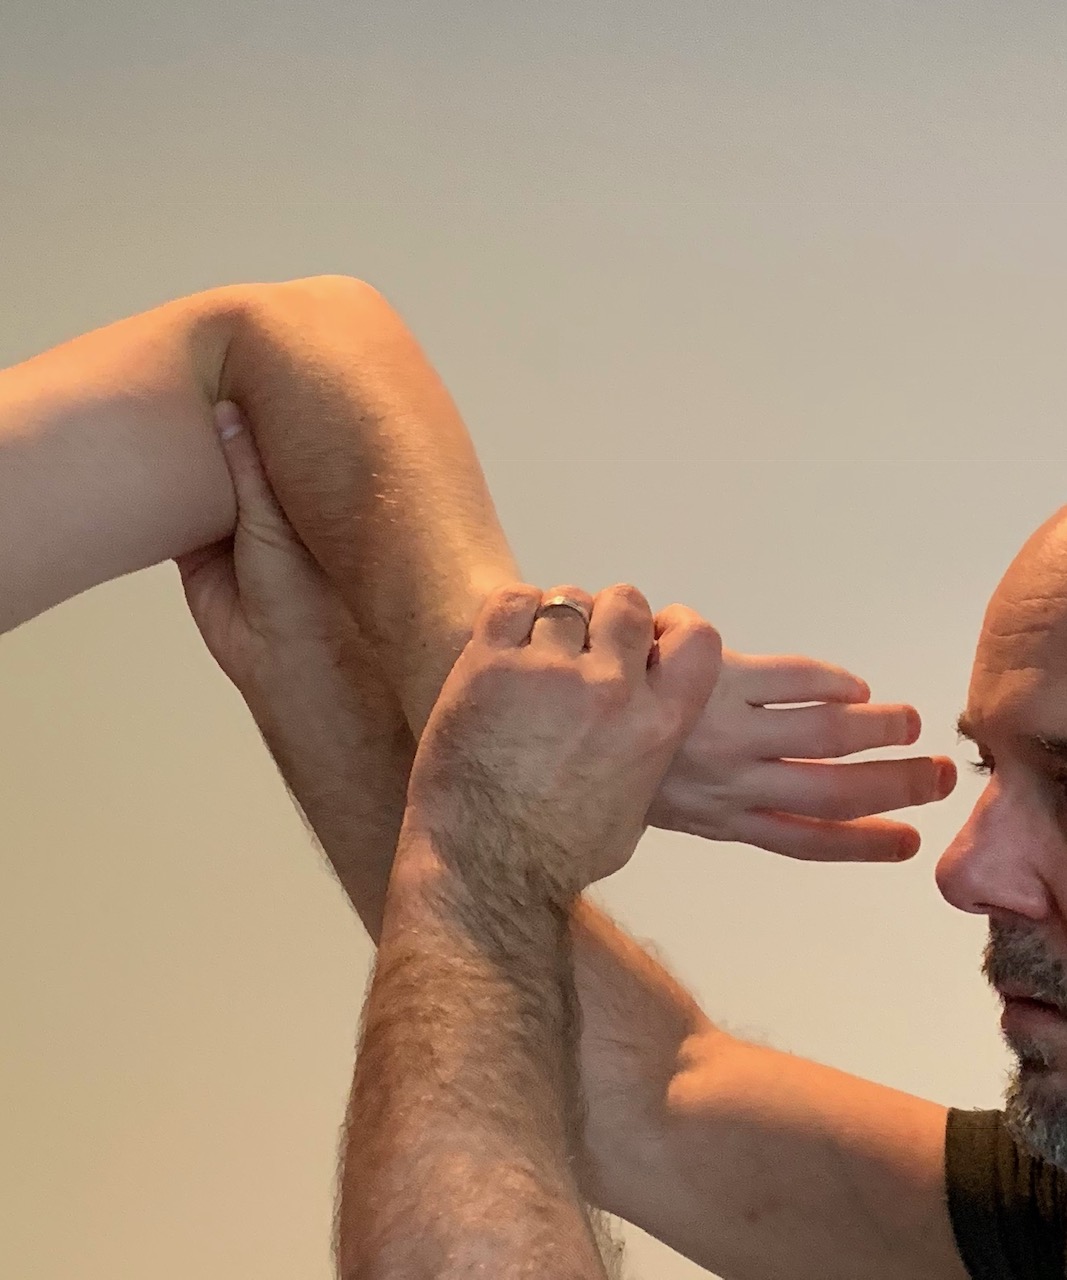
  3. Nage’s striking hand then takes uke’s grabbing hand to strip it and return it toward uke’s face.
  4. Uke protects by raising the elbow, which nage then takes for the control and executes a downward cut for ikkyo.

The geometry of the footwork needs to be precise. Kihon waza should be didactic and regimented to ensure accurate transmission and execution. The angles of the hand work also requires discipline to allow fluidity to develop without inculcated bad habits (allowing openings).

Cutting rose
Cutting Rose

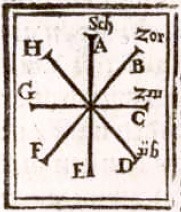
Keep the cutting rose in mind. This is your mental map uke is at the center.  Your atemi is on the E ->A line. The destabilization is H->D. Your return is D->H.

The footwork is a simple angle change – move in, strike, break balance and flank.  Return through uke’s center from the superior angle.

The kihon handwork is a control/strip. Nage grasps uke’s hand to force a release and keeps a compression grab to execute a strike and control throughout the movement. Note that the grabbed hand must act as a spear-thrust to help drive uke’s response (elbow compression)

dagger hand
Active spear-hand

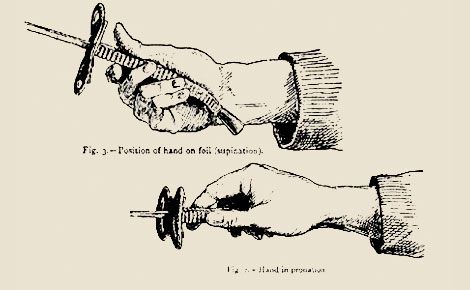
The strip is from the top (the high gate) meaning you must cover and control uke’s grab hand.

high gate
bone lock the high gate strip

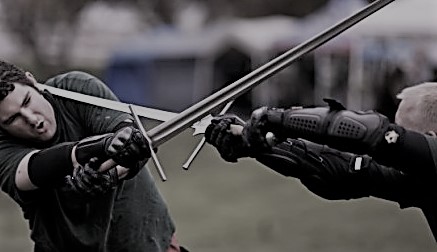
The second variation would be to come from the low gate which replicates the sword movement and looks like ai-hanmi insofar as nage does not grab uke’s hand/wrist but rather maintains a pressure contact.

low gate.jpg
pressure compress the low gate

As with almost all techniques, once contact/control is established with the upper body, the driving force is the lower half – engage those glutes and quads starting with the feet. Lower your fundament below the line of your uke’s hips by softening your knees then drive up and through uke’s position while pressing uke’s elbow toward their ear and simultaneously cutting down (uke’s elbow is your kissaki).

Uke is now controlled, their arm parallel to the mat and your vector of travel through their center is done with a downward focus on uke’s shoulder – the bursa should hit first to close any tsuki (openings) afforded to uke’s free hand. Following uke to the mat, nage drops the inside knee first to uke’s arm-pit while keeping a vertical pressure through the controlled arm toward the shoulder. Using the outside leg as a brace, nage can now sit seiza as uke’s arm slides down nage’s thigh to the arm trap. Sitting proper seiza, back straight, toes up, buttocks on heels, nage can slide uke’s arm flat to the mat.

In every pin where uke’s arm is flat against the primary rule is this: uke’s arm must be above the line defined by uke’s scapula. This is why nage’s inside knee must be at uke’s armpit and be the first point to touch the mat. Nage’s knee defines the pivot point and contact point so when nage slides uke’s arm down nage’s thigh, nage can maintain and increase the controlling pressure down and into the mat.

Arm above the scapula, nage should use the shyuto to control uke’s elbow (nerve compression) and the grasping hand needs to roll uke’s trapped hand so that uke’s shyuto is against the mat. Nage then applies a compressing pressure – palm to back of uke’s hand with attentive focus on uke’s index finger which needs drive toward uke’s ear.

In the second variation (which essentially is ai-hanmi) nage never grabs uke’s hand, therefore the pin is achieved when uke’s arm is flat against the mat, nage will press down on uke’s elbow but lift at uke’s wrist. Opposite force vectors to achieve a pain compliance (attacking the bone structure).

From ikkyo, all other techniques flow. [1]

Nikkyo is achieved just like ikkyo with only the pins being different. Nikkyo essentially results from uke being less docile once taken to the mat, necessitating a more robust pin. The omote version results from uke trying to rise, forcing nage to drive more forcefully on the shoulder and raising uke’s arm vertical. From that vertical position nage should pull uke’s arm tight to nage’s chest (eliminate all slack), then cradle uke’s elbow and forearm as nage leans forward from the bladder, keep your weight down but lift your tailbone (coccyx), and feeling uke’s arm can travel no farther, turn towards uke’s head without allowing the trap to loosen. This pin attacks the structure of the shoulder.

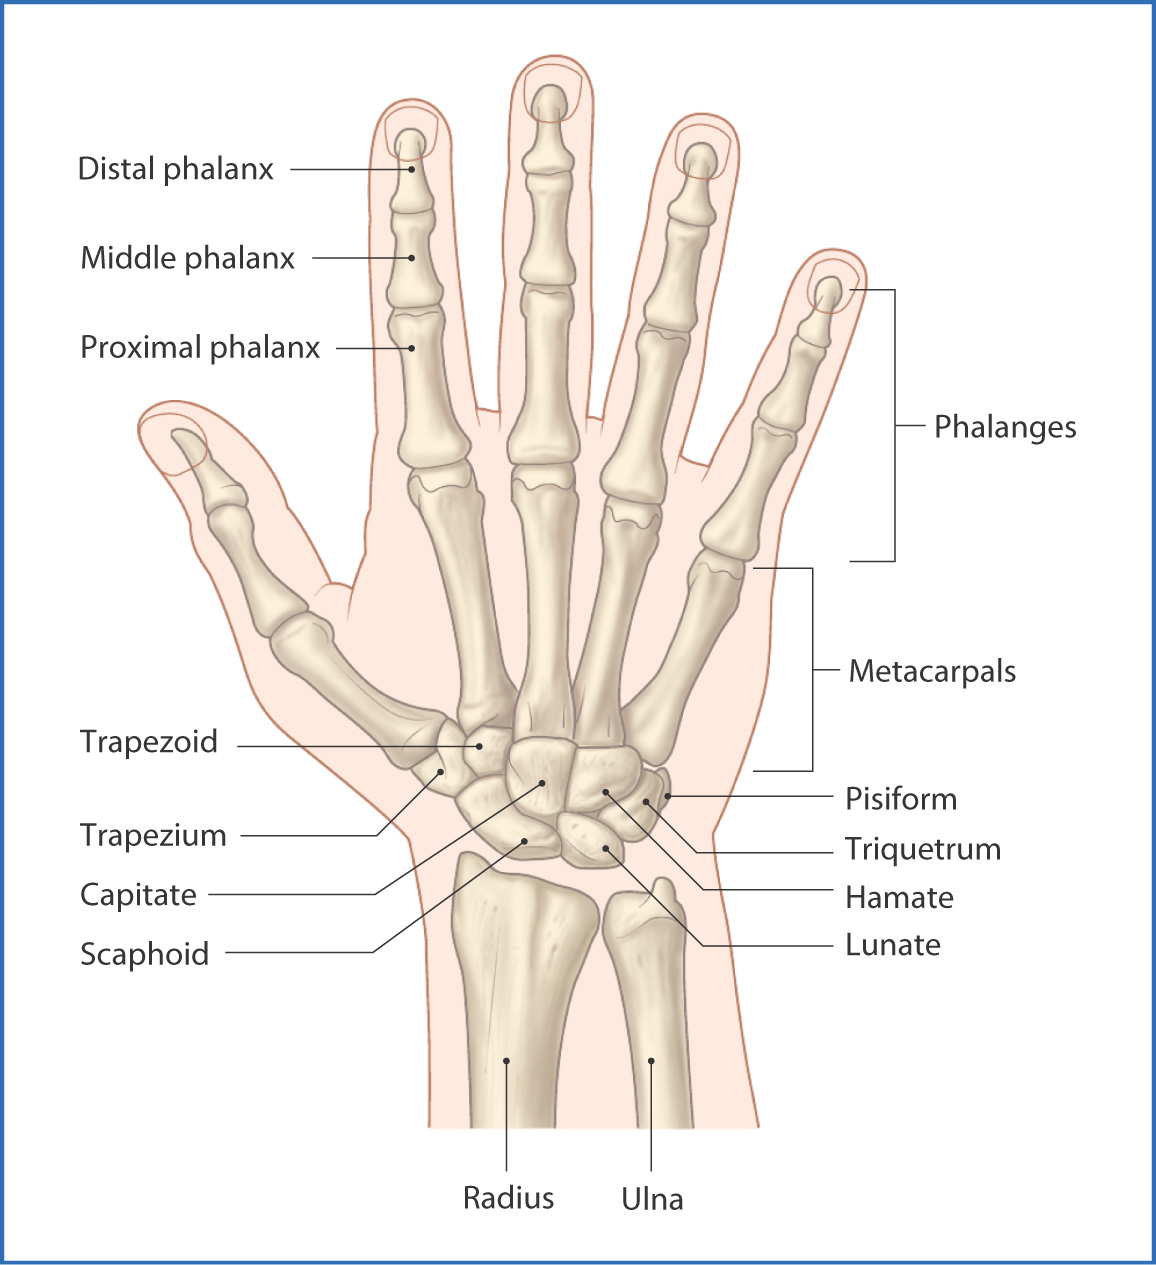
The ura variant has two primary approaches, both however result from uke being more stable and thereby preventing nage from coming directly through uke’s center. Meeting resistance, nage smoothly adapts by rotating to the outside line. Adapt and overcome!  If this rotational energy is sufficient to bring uke belly to mat, then pin the arm flat and as uke tries to rise again, bring uke’s controlled wrist to the chest lean forward to keep compression and nage uses the free hand to control uke’s forearm which, grasping above uke’s wrist, is levered down – nage closes his elbow to ribs. A two-point bone lock that concentrates all forces at the base of uke’s wrist at the carpal bones (i.e., all those bones below the metacarpals).

bones of the wrist
Bones of the hand

Details to focus on for the nikkyo pin: Make sure that uke’s thumb is firmly pressed into your chest – allow no air gaps. The bones of uke’s hand should be aligned with uke’s radius and ulna – do not focus on ‘bending’ uke’s wrist. I describe this as bone locking for a reason – we are exploiting anatomical weaknesses. This compression is high to low (since uke is at a lower level – closer to the ground than nage).

A second variant occurs when uke does not go entirely to the mat with one rotation or when uke rises faster than nage can apply the pin. In this instance uke and nage are roughly at the same elevation. Therefore, nage must start the pin by compressing uke’s hand to nage’s chest, but then nage should force uke’s elbow up, such that nage can now palm uke’s elbow to do a dual vector compression – treat uke’s forearm like an accordion: drive your chest and uke’s hand toward uke’s elbow point which is being driven down and toward nage with nage’s free hand.

As part of kuden, I have shown Mulligan sensei’s ‘snake,’ reverse grip and use of the head as augmentations to the kihon.  Keep those tricks in your repertoire.

kanji_kihon

________________

[1] A more refined approach would mimic Tissier sensei’s presentation but I would submit that one cannot focus on his flow pattern without a solid understanding of the basics outlined above.

CIRCULAR DISSOLVES

Circular dissolves.  Master Keating explains the concept.

What we explore here is a counter-clockwise dissolve but the concepts are applicable to clockwise dissolves.

For the last several classes we have been exploring circular dissolves though the simplified cross-hand encounter – aihanmi katate dori (R/R, L/L grasps).

Setting the encounter:

Nage presents hand thumb up – uke grasps to control the offered hand.

Nage uses rokyu-kokyu to initiate a release, then uses the shyuto to cut over uke’s hand in a counter clockwise (outward) rotation to complete the release.  Nage’s hand is now on the outside line.

Explaining the encounter:

Aikido uses similies and metaphors to provide context: “Shomen is like a sword strike,” “Chudan tsuki represents a dagger thrust,” etc., forgetting the importance of the analogy.  A mid-level thrust is a dagger, spear, or punch.  A direct assault is not a metaphor.  Put yourself in the proper mindset.  These are real encounters and you cannot assume an unarmed opponent.

What then is aihanmi katate dori?  It is a straight thrust encounter between two same-hand dominant players.  Review the doce-pares map – aihanmi is a #5 line.

Keating Doce Pares
Master Keating’s diagram

Notice that an encounter on #5 represents any number of possible scenarios: Nage thrusts uke grasps the hand to stop the thrust.  Uke thrusts, nage responds.  Nage and uke start in a cross weapon encounter.

The secret is: the specifics of the encounter are irrelevant!  It is very easy to get lost in the nuances and many instructors make a living off playing these specifics as if they were the primary focus of training.

Cross weapons.  You have precisely one problem to solve: control the center.

Control the center.jpg
Center controlled!

From a single handed encounter there are three primary strategies: beat, circle over (counter clockwise), and circle under (clockwise).

Hand position
Modern fencing

As usually given, Aikido’s aihanmi katate dori presented palm up is the circle over and when presented palm down it becomes a circle under.  Put a weapon in your hand and it becomes more obvious – the arc is shorter to gain the advantage.

With a katana, this is the opening move in san no tachi, where the cut over controls the opponent’s sword with an attempt to take the opponent’s thumb.  With a knife it is a bait and the circle becomes an attack to the opponent’s flexor tendons.  With the empty hand it becomes a release followed by a controlling pressure on the outside dominant line.  In all these encounters, the counter clockwise dissolve allows nage to control the centerline.

Abdominal-Aorta.jpg

Think on this: the release is not an extraction or escape, it is your ‘go to’ move.  From aihanmi with the counter clockwise cut over, contact is maintained arm to arm but nage controls the center from the outside line.  The targets change depending upon the level of the response – at the gedan level, nage targets the tendons in the back of uke’s lead leg behind the knee.  At chudan level the target can be a thrust to the center line (abdominal aorta) or a draw cut to the underside to hit the flexor tendons.  At jodan level the target is the soft palate or eyes.

All these show the power of the response on the direct line (irimi).  The bunkai shows the ‘why’ of the initial encounter.

The aiki lesson is the subtle maintenance of pressure combined with the freedom of flow.  The initial point of contact is the axis of the encounter.  Nage must learn to extract from the grasp without unnecessarily providing more pressure (information) or attempting to move the point in three-dimensional space.

Once that skill is mastered, the next step is pressure replacement – i.e. the back hand must replace the initial grasped hand to maintain control over uke.  This was discussed when exploring a punch to the face with the use of the checking hand.  Replacement is similar – in a two-beat tempo, you extract one hand and then place your opposite hand on the same spot without disrupting uke.

Hence the importance of aihanmi-katate-dori irimi tenkan as a developmental exercise.  Nage must learn to cut over, extract, replace with the upper body and simultaneously enter and turn parallel to uke.  The number of discrete moves (beats) nage must execute relative to uke is dramatic.

BeatNageUke
0present handgrab hand
1cut over
1.5extract
2replace

Study that imbalance and consider: are you that much faster?  In general terms there is a 2 to 1 imbalance in action (and this is just the upper body action).  Recognize that this is a simplified matrix that we must build from.  But it points to the need to understand action sequences and beats.

Although the start of class was with irimi-tenkan to develop dexterity and sensitivity, the circular dissolve can be done without the tenkan.  Review Kotegaeshi to Iriminage.

Furthermore consider: Irimi nage direct on a 5, 3, 1 beat tempo.

Kihon waza is a 3 beat sequence.  From aihanmi katate dori, nage (1) cuts over with the front hand while entering irimi, (2) grasps uke’s neck with the back hand, (3) uses the now free front hand to throw.

The 1 beat sequence is often shown as an ‘advanced’ technique because it is a continuous-connection throw.  Nage executes the cut-over dissolve while driving forward low-to high with uke’s arm now trapped.  A one-breath throw.

But neither of these beats anticipates a potential thrust, retract, thrust response from uke.  The kihon presentation presumes that uke does not react to the initial cut over.  Therefore, we must add beats to break facile model of the encounter.  Nage may have to add checking moves (additional beats) to follow uke’s retracting move (a set up to a second thrust) and this is where a 5-beat pattern comes into play. From aihanmi katate dori, nage (1) cuts over the front hand while entering irimi. Uke counters by retracting for a second thrust, thus nage (2) checks uke’s arm with the back hand, (3) replaces the control with the front hand, allowing the back hand to climb up the limb and (4) grasp uke’s neck with the back hand, (5) to use the now free front hand for the throw.

Circular dissolves on the vertical plane are done primarily with the upper body.  Horizontal dissolves are executed primarily with the lower body.  Ushiro-tenkan is a tool to explore that aspect of the art.

USHIRO TENKAN

Gyaku hanmi katate dori ashi sabaki.  I use the static encounter as a starting point because it safely teaches powerful concepts.

Shibata
The purpose of Aikido is to kill

Aikido’s focus on connection is important to feel as a bodily (somatic) connection with your partner.  From the moment uke grasps nage’s hand, nage must sink (break plane, dropping the center) in order to capture the encounter.  Nage then shifts off line (to uke’s flank) to enter with a circular hip motion that drives the hand forward.  The hand looks like it is a driving force, but the elbow must be soft and the shoulders relaxed so that nage can drive from the low to high-line.  Entering to control the center line nage’s elbow will be up and the shyuto edge toward uke’s center.  I have covered this in earlier posts in more detail so I cover it in only a cursory manner here.  Connection is key (hara to hara engagement).  Uke must continue to face nage as long as possible through the action.

The power of the exercise is the principles of motion it unlocks.  Tighten the lines, increase the tempo and add broken timing and the combative possibilities manifest: With a weapon, this is an inside parry-riposte.  In boxing it is a block-(counter) punch.  In Aikido it is a key to better understanding the direct response to yokomen.

This morning we added ushiro-tenkan as a lower body complication to the movement.

From gyaku hanmi, the wrist grab establishes a ‘ball joint’ connection that both players need to respect- this is the axis of the encounter. [1]

Ushiro-tenkan is an absorbing act – uke approaches nage with advancing energy to grasp nage’s wrist.  At the moment of contact, nage keeps an equal forward engagement while breaking plane using the same ashi-sabaki upper body mechanics, but with the lower body doing a circular dissolve.  (Reflect on this: dissolves can be done with both the upper body [mechanical redirects] and with the lower body [positional disengagement].)

As a tanren-geiko (body development) this is an aerobic burn.  Nage is in the center of the circle and must execute a rotation of greater than 180-degrees (I prefer to hit at least a 270-degree arc).  For nage it is a grounding exercise – learning how to keep a stable center whilst rotating and keeping connected to uke.  Uke is racing to keep up because of simple geometry.  Nage’s arc forces uke to race the circumference of the circle, ultimately flying away once the connection breaks due to momentum.  For this first stage, the exercise is developmental: learning mutual timing to keep connection, finding when the connection breaks based on angle and momentum, playing with changes in elevation, and most importantly learning to feel more than just the arm contact.

Once both nage and uke can maintain connection by learning the basic mechanics of motion, the focus should come back to the ball-joint created with (uke’s) hand grasping (nage’s) wrist.  Nage’s lower-body ushiro-tenkan action will take uke’s balance (through a continued ‘invitation’ to move continuously forward).  At the point where uke is at the apex of their movement, nage should then be driving the grasped hand from low to high up uke’s center line to traverse uke’s chin and neck (while still inviting the advance) to execute irimi-nage (direct) as either a stretch or throw.  Both players should feel how the connection rolls – I described the hand-to-wrist connection as a ball joint very purposefully.  That rolling mechanical connection between the players is critical.  There will be similar feelings of capture and tensioned rolling in weapon play.  Add the weapon into nage’s hand and the implications of this are grave in extreme. [2]

Ushiro-tenkan irimi nage direct then readily flows to the first variant.  Assume uke is still too solidly balanced to move through at the apex of their movement.  Nage must then adjust to throw with movement – not arm power.  As an indexing exercise, nage should bring uke to the point where irmi-nage direct is possible – but rather than stepping forward and closing the arm to throw uke – nage continues to rest the throwing arm across uke’s neck, but then moves behind uke to collapse the structure.  For nage this should be a smooth and powerless throw – meaning that rather than stepping through uke’s center, nage now steps behind it.  The footwork drives the throw, but there is a hidden arm movement that solidifies the action.   As nage moves behind uke, nage should be in the position to execute an elegant rear-naked choke.  I also showed the implications of the Bagua Teacup exercise.  The simple act of stepping behind uke amplifies its martial effectiveness when nage has proper integration of the upper body arm mechanics.  We will reserve a deeper explanation as kuden for the classroom.

As a progression exercise we then moved to uchi-kaiten nage.  The flow progression results from the “what if” questioning (which I encourage all students to do – always question!).  If nage attempts irimi nage direct and uke is able to block the entry, they will only be able to do so by creating an opening (tsuki) on the low gate.  Which is to say, nage has advanced in and up with the fingers toward uke.  Uke has maintained connection and stopped nage’s advance.  There is now an arc created by both player’s arms and nage must step through that opening and snappily turn their hips while simultaneously cutting the grasped hand down.  (From a pedagogical progression, the step before uchi-kaiten- nage, is kokyu-nage.)  If uke breaks connection as nage cuts precipitously down, then the throw is called kokyu-nage.  If uke maintains connection, then nage must pick up control of uke’s lowered head, keep it down and lever the arm across uke’s back for kaiten-nage.  Think on this progression and feel the rolling action of that ball-joint connection.  That ball joint must flow – your goal is to have it feel well-greased and not forcibly move it through space.  Play with a gyroscope.  Get it spinning and then roll it in your hand as you move through space.  It wants to resist your motion.  With a similar idea, you want to transmit as little force/information through that connection with your partner lest they resist you.

This is the higher art: manipulation through connection.

______________________

Beyond Horizon

[1] Respect:  to quote Robert Heinlein, “An armed society is a polite society.  Manners are good when on may have to back up his acts with his life” (Beyond This Horizon, 1942). Humility should result from two deep lessons: there is always someone better than you and you will never know who that person is.  Therefore treat everyone with respect (circumspect).  Less cynically: the encounters we set up in Aikido are derivative from weapon based engagements.  Treat all encounters as if they were armed engagements.

[2] There are any number of deadly variants, some of which are contingent on the weapon used.  In class I showed some basic concepts that are not paramount to Aikido’s focus on connection but should inform your understanding of the movement.  When the blade is held fore-grip, start by (1) breaking plane – when uke grasps the weapon hand to control, immediately flick the blade off-line (to the outside) then snap your elbow down and immediately bring the point back to center.  This will cause uke to pitch themselves onto the point (usually with their soft palate); (2) the move up the centerline from low to high could be a stab (a #5 at any level) or can skid up the sternum to the neck then over to hook behind uke’s head.  If done with the blade in reverse-grip (or with a karambit), (1) breaking plane is an immediate attack to the flexor-tendons (uke’s forearm interior), and (2) the rising line to the neck for a traditional irimi-nage is a continuous contouring cut.  I also showed that the knife in reverse-grip could just as easily be elbow strikes (we are just moving up one joint as the impact point: from hand/wrist with a weapon to the elbow without).  Panatukan concepts should inform the close quarter interpretation of these movement patterns.