Tsuki (‘thrust’) in Aikido should replicate a knife thrust.
We have focused on the high-line (jodan) first because it was a pedagogical thread from kata-dori, but also because a thrust to the face elicits a strong ‘flinch’ response. It is harder to maintain ‘zanshin‘ when pressed with a high-line attack.
This morning we moved down to the mid-line (chudan). The static cognate here is gyaku-hanmi katate-dori – remember gyaku is simply a R/L or L/R orientation. Why start here? Because it is a reference point.
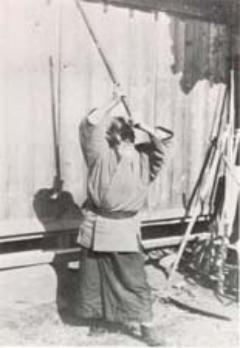
To start the logic-chain, perform gyaku-hanmi katate-dori tenkan with a good lineal entry, not the ‘standard’ half arc where the feet precedes the hand. Remember: weapon, body, hand! On your entry, your free (i.e., back) hand should be able to perform a strike to tori’s throat, carotid, eyes, etc. with a straight blast before any rotation to the shikaku.

Once your body/mind recalls basic geometry that the shortest distance (and therefore the fastest entry) is a straight line, proceed to the punch. From punch, meet with the lead hand: tori attacks right thrust, nage meets with a left hand stop hit. Then move around the point of contact to tenkan (2-beats). Standard technique, standard timing, standard tempo. Now play with the tempo, with a one-beat entry, flow from the stop hit to the quadriceps – this is a flow strike as you enter using only the one hand for contact – a R/L or L/R contact only. Then play with the cross-hand (i.e. ai-hanmi) so from the tsuki we do the standard cut-over (i.e., a R/R or L/L) contact for the ‘standard’ gedan level entry. This sequence requires both hands – cut over, then control with the second hand. From the second hand contact, we establish connection – kimusubi.
The principles we are employing – (1) attack the attack – hit the first thing that moves (2) follow connection back. The first should be obvious, the second requires a good connection. Take kote-gaeshi for example.
Tori attacks chudan tsuki – nage does a flow hit to connect – tori chambers for a second strike – nage must stay connected, follow the flow back (i.e., close the distance to tori’s center) and then perform kote-gaeshi with the free hand.[1] The actual technique can manifest any number of ways (high-dexterity [hand to hand[, gross motor [elbow to hand], etc.) the goal is to learn to connect and more importantly, read the connection to be able to maintain it.
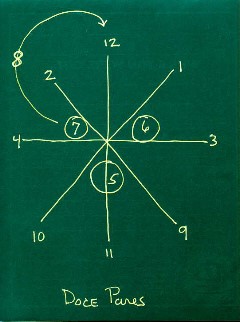
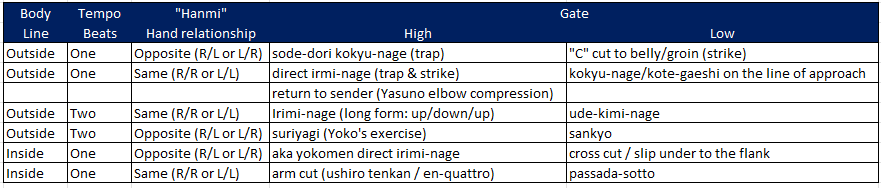
Beats. Playing with tempo. Build a matrix – to help clarify the possibilities from the positional relationships
| R/R (L/L) Cut Over [Aihanmi] | |||||
| Beats | Front H | Rear H | Front H | Rear H | Front H |
| 1 | flow strike to thigh – destabilize | ||||
| 2 | Strike | Kokyu / kotegaeshi/ irimi nage (direct) | |||
| 3 | Strike | Trap | Irimi Nage | ||
| 4 | Strike | Trap | Replace | Kokyu | |
| R/L (L/R) Stop hit [Gyakuhanmi] | |||||
| Beats | Front H | Rear H | Front H | Rear H | Front H |
| 1 | Stop hit flow to kokyu | ||||
| 2 | Stop hit | Kotegaeshi | |||
| 3 | Stop hit | Replace | Kokyu |
This is not dogma – just a framework (a heuristic) to help your body remember some of the possibilities at each position. And recall – these are all plays from the Outside line – we did not move to the inside today. How would the matrix change it we were playing on the inside?
To avoid a limited tool set, we added the low line kick as an additional or substituting beat. For example, tori attacks R, nage uses the L knee to hit the sciatic and/or muscular branches of the femoral nerve just below the insert of the femur and uses L to perform kokyu.

This is a pure blend – meaning tori’s attack is avoided, not intercepted. An additional substitution is the low-line kick to the back of tori’s knee. Please note, fundamentally all these are the same technique – kokyu-ho – just ‘weaponized’ and using different beats (one for one, two for one, etc.). However, the presentation may make it appear as if they are ‘different’ – the 4-beat kokyu will (should) resemble a wing chun chain boxing entry for example. But the reason it looks similar is because we are trying to ‘solve’ the same ‘problem.’
I hope it is clear (re-read the very first post) that this blog is not intended to ‘teach’ kihon waza. I presume a high level of knowledge as a starting point. We are exploring the concepts, not technique per se, we are moving from principles: follow contact, fill voids, strike that which moves first, attack the attack, dissolve lines, etc., from the principles reverse engineer the techniques at different ranges and tempos. Add to that the fixed nature of human anatomy and we find there are a delimited number of ways each party can move and therefore there is a circumscribed number of possible patterns of interaction. The combinations are neither infinite nor mysterious.
_____________________________________________________
[1] Second strikes. In the standard presentation, tori performs a single committed attack that nage must contend with. What is rarely presented is the multiple attack sequence, meaning – if tori’s first attack fails it will be followed by a second or third attack. The marketing failure for Aikido as an art is that it has not adapted to ‘reality-based’ training presumes a committed and persistent assailant. In short, tori will (and should) press every attack and opening.
I have only infrequently and inconsistently presented multiple attack sequences (yokomen – gyaku yokomen; tsuki, followed with a second tsuki, etc) but I would suggest it is imperative to train with the multiple or compound attacks in mind. The combative arts always teach multiple and compound attacks (there is no one-step kata)
Review Tactics and Stealing From the Masters
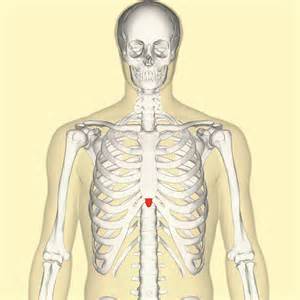
Xiphoid Process – diaphragm – know what you are hitting and why