USHIRO TENKAN

Gyaku hanmi katate dori ashi sabaki.  I use the static encounter as a starting point because it safely teaches powerful concepts.

Shibata
The purpose of Aikido is to kill

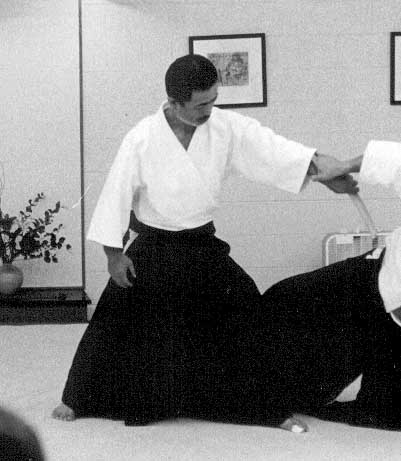
Aikido’s focus on connection is important to feel as a bodily (somatic) connection with your partner.  From the moment uke grasps nage’s hand, nage must sink (break plane, dropping the center) in order to capture the encounter.  Nage then shifts off line (to uke’s flank) to enter with a circular hip motion that drives the hand forward.  The hand looks like it is a driving force, but the elbow must be soft and the shoulders relaxed so that nage can drive from the low to high-line.  Entering to control the center line nage’s elbow will be up and the shyuto edge toward uke’s center.  I have covered this in earlier posts in more detail so I cover it in only a cursory manner here.  Connection is key (hara to hara engagement).  Uke must continue to face nage as long as possible through the action.

The power of the exercise is the principles of motion it unlocks.  Tighten the lines, increase the tempo and add broken timing and the combative possibilities manifest: With a weapon, this is an inside parry-riposte.  In boxing it is a block-(counter) punch.  In Aikido it is a key to better understanding the direct response to yokomen.

This morning we added ushiro-tenkan as a lower body complication to the movement.

From gyaku hanmi, the wrist grab establishes a ‘ball joint’ connection that both players need to respect- this is the axis of the encounter. [1]

Ushiro-tenkan is an absorbing act – uke approaches nage with advancing energy to grasp nage’s wrist.  At the moment of contact, nage keeps an equal forward engagement while breaking plane using the same ashi-sabaki upper body mechanics, but with the lower body doing a circular dissolve.  (Reflect on this: dissolves can be done with both the upper body [mechanical redirects] and with the lower body [positional disengagement].)

As a tanren-geiko (body development) this is an aerobic burn.  Nage is in the center of the circle and must execute a rotation of greater than 180-degrees (I prefer to hit at least a 270-degree arc).  For nage it is a grounding exercise – learning how to keep a stable center whilst rotating and keeping connected to uke.  Uke is racing to keep up because of simple geometry.  Nage’s arc forces uke to race the circumference of the circle, ultimately flying away once the connection breaks due to momentum.  For this first stage, the exercise is developmental: learning mutual timing to keep connection, finding when the connection breaks based on angle and momentum, playing with changes in elevation, and most importantly learning to feel more than just the arm contact.

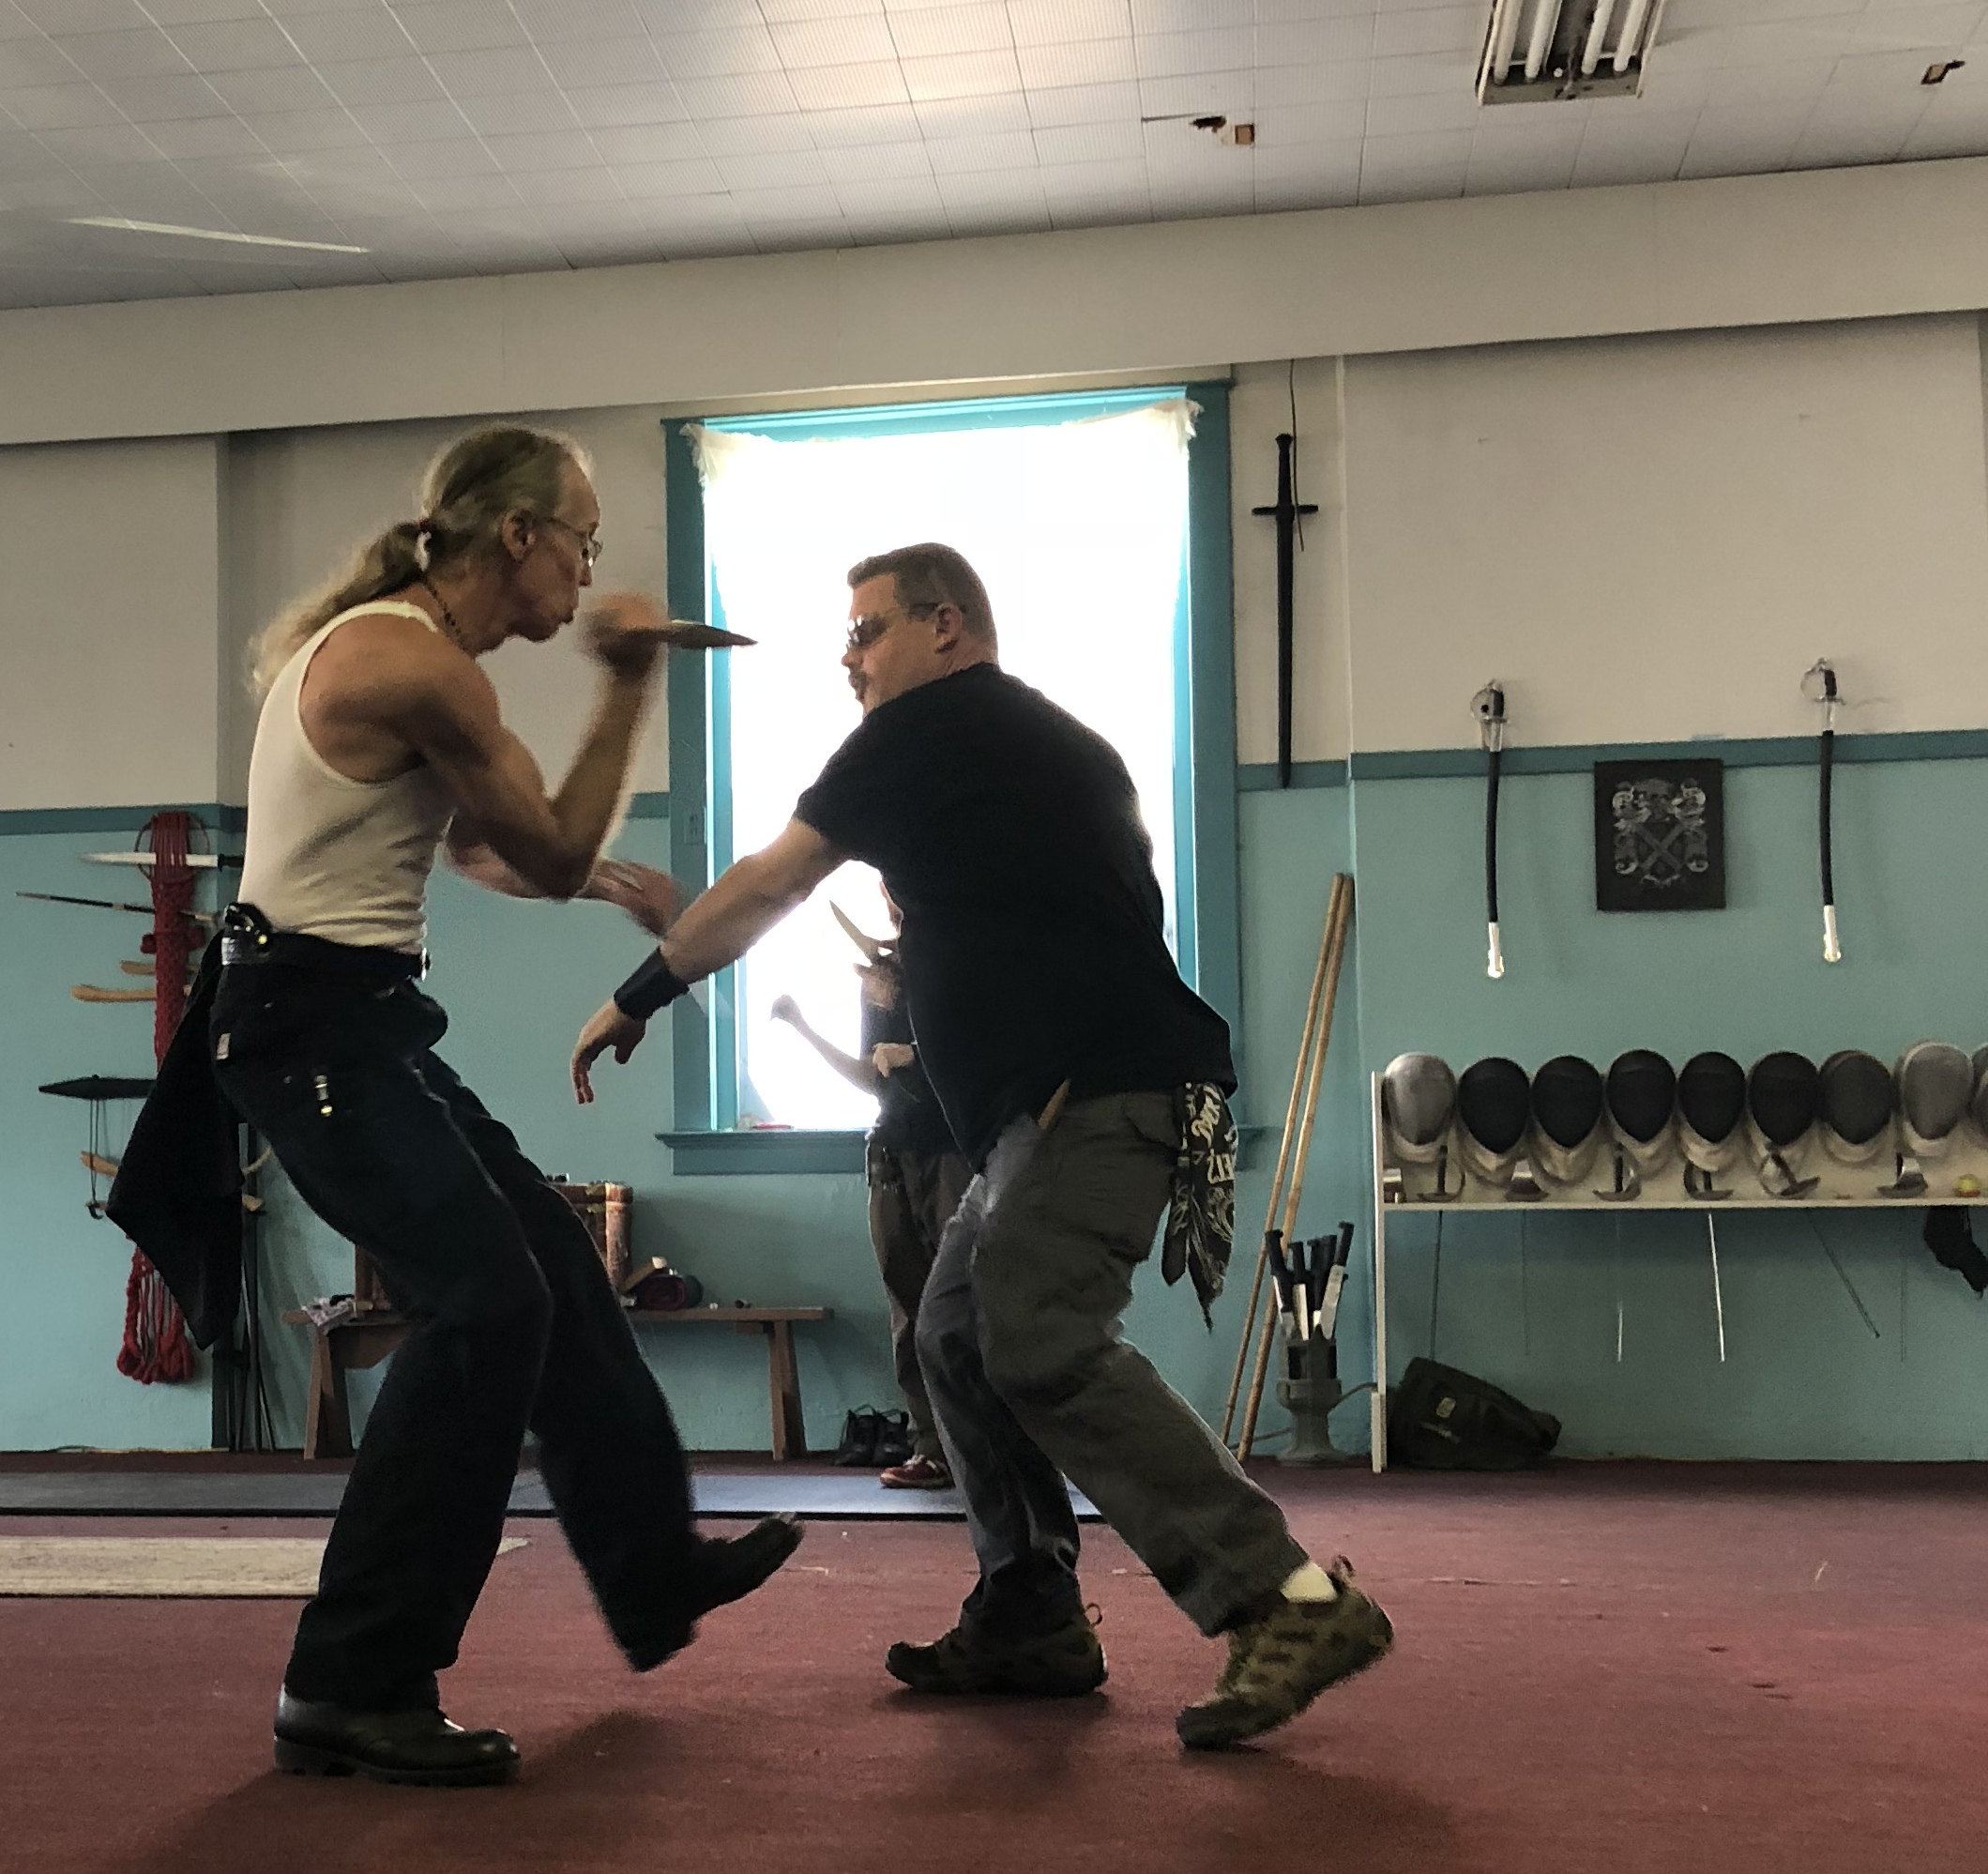
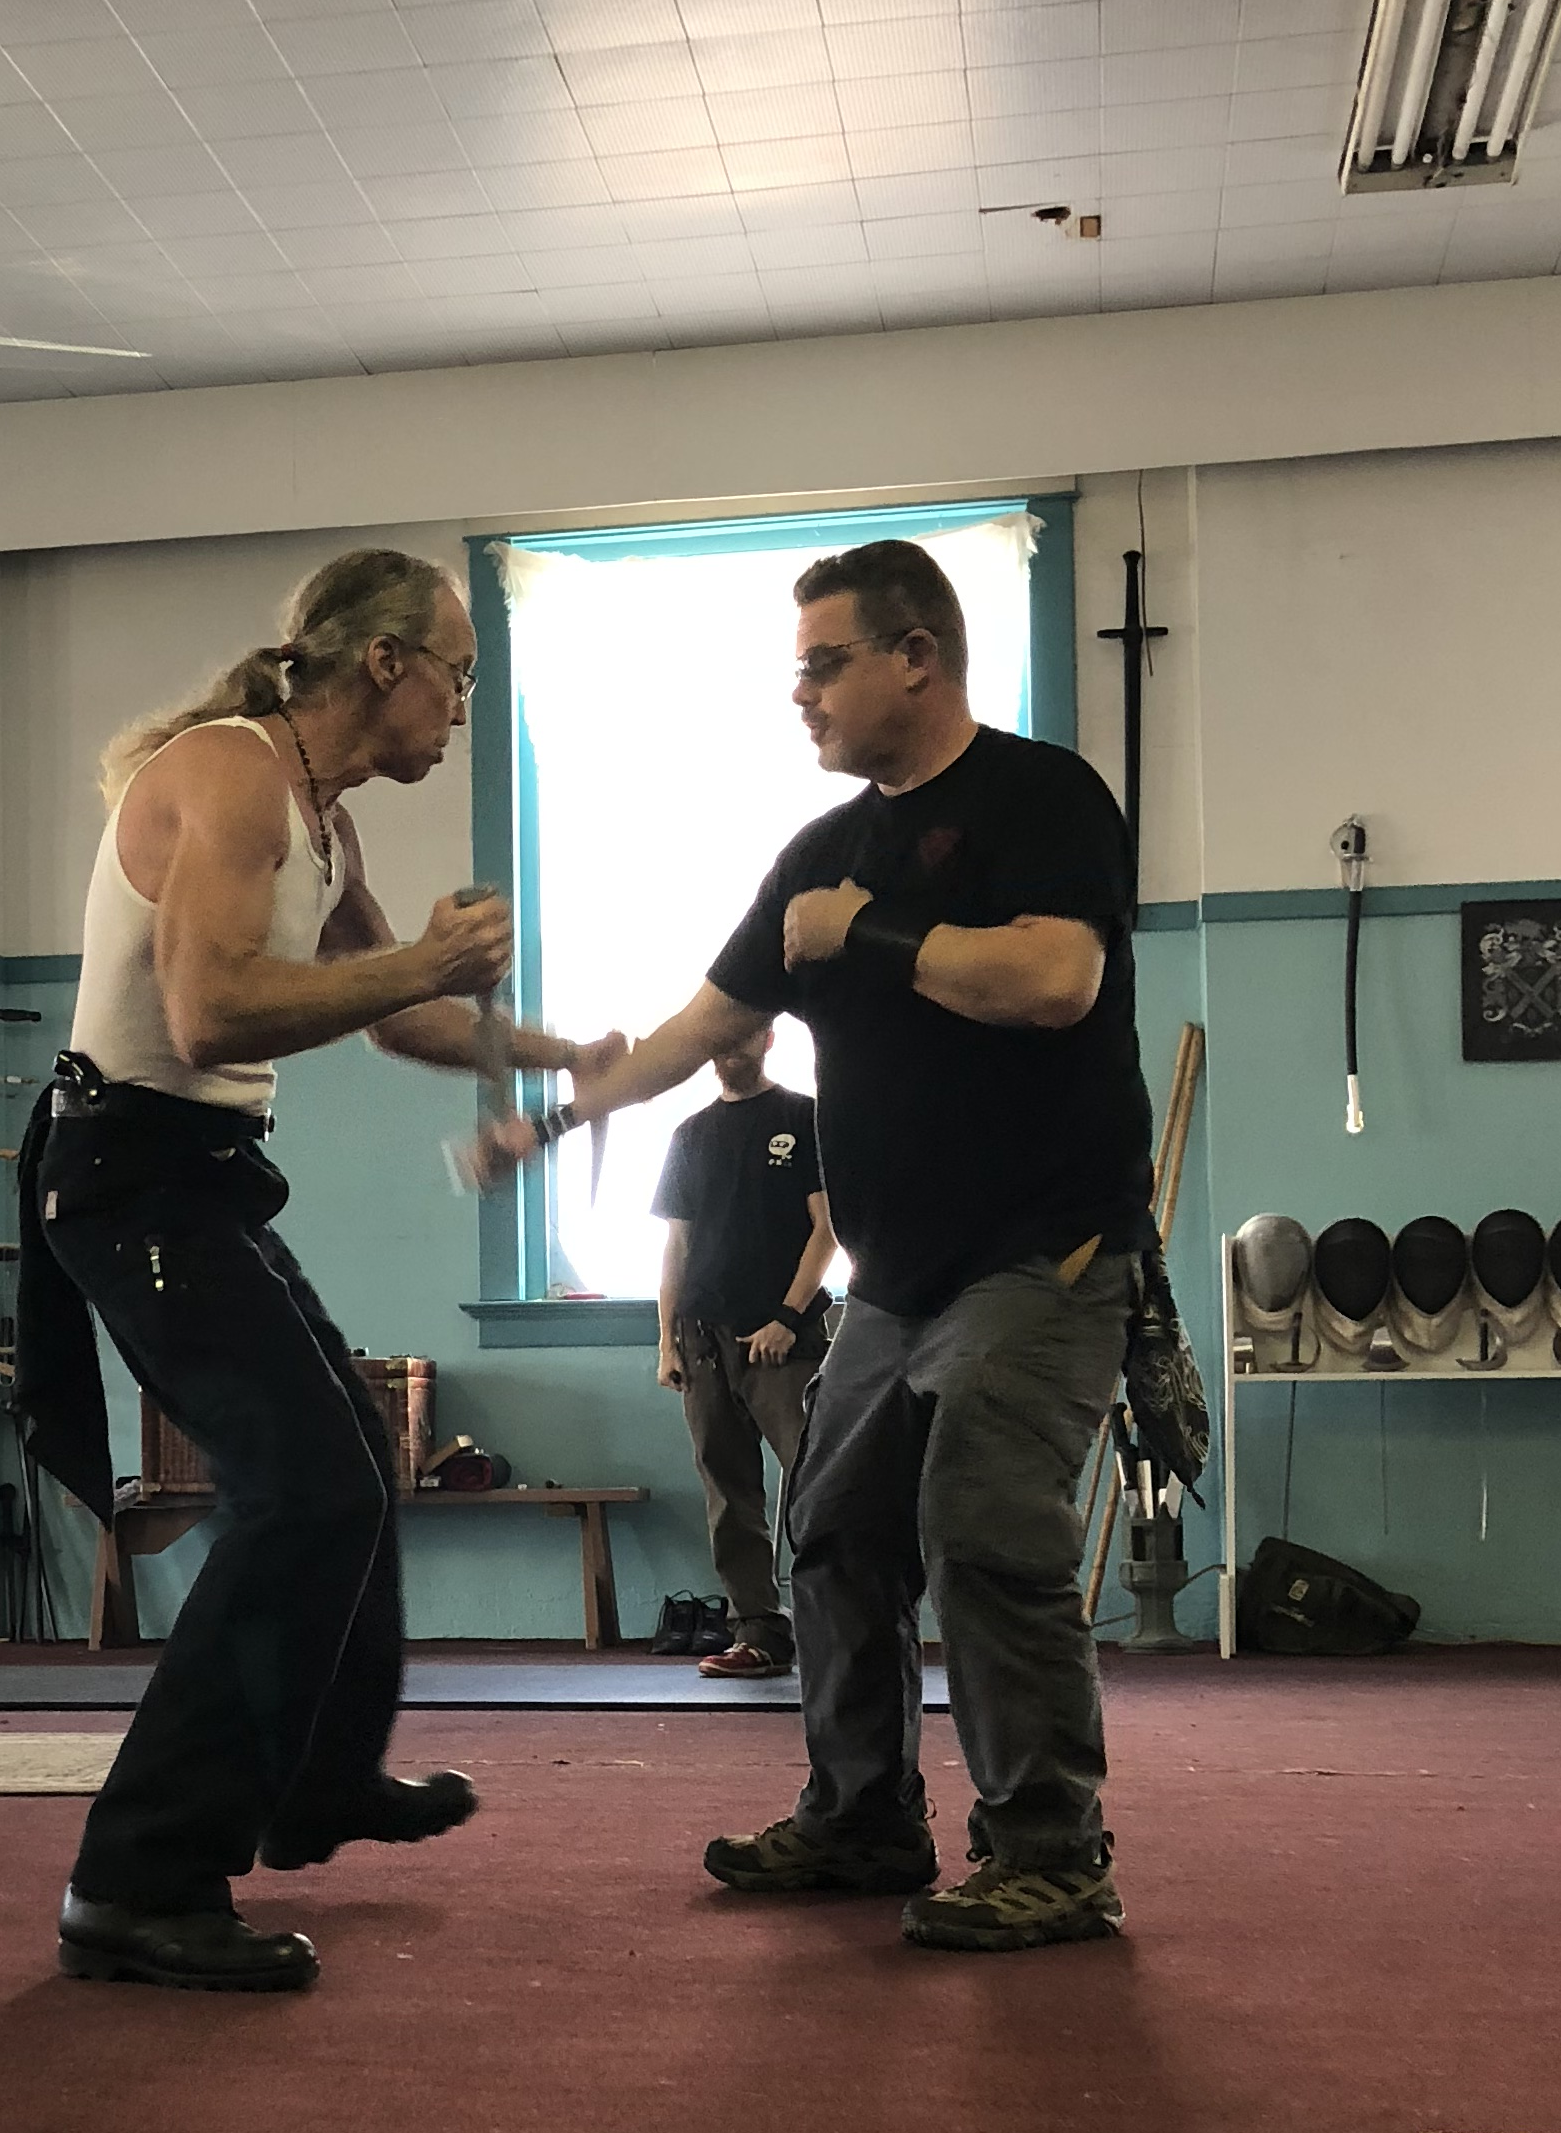
Once both nage and uke can maintain connection by learning the basic mechanics of motion, the focus should come back to the ball-joint created with (uke’s) hand grasping (nage’s) wrist.  Nage’s lower-body ushiro-tenkan action will take uke’s balance (through a continued ‘invitation’ to move continuously forward).  At the point where uke is at the apex of their movement, nage should then be driving the grasped hand from low to high up uke’s center line to traverse uke’s chin and neck (while still inviting the advance) to execute irimi-nage (direct) as either a stretch or throw.  Both players should feel how the connection rolls – I described the hand-to-wrist connection as a ball joint very purposefully.  That rolling mechanical connection between the players is critical.  There will be similar feelings of capture and tensioned rolling in weapon play.  Add the weapon into nage’s hand and the implications of this are grave in extreme. [2]

Ushiro-tenkan irimi nage direct then readily flows to the first variant.  Assume uke is still too solidly balanced to move through at the apex of their movement.  Nage must then adjust to throw with movement – not arm power.  As an indexing exercise, nage should bring uke to the point where irmi-nage direct is possible – but rather than stepping forward and closing the arm to throw uke – nage continues to rest the throwing arm across uke’s neck, but then moves behind uke to collapse the structure.  For nage this should be a smooth and powerless throw – meaning that rather than stepping through uke’s center, nage now steps behind it.  The footwork drives the throw, but there is a hidden arm movement that solidifies the action.   As nage moves behind uke, nage should be in the position to execute an elegant rear-naked choke.  I also showed the implications of the Bagua Teacup exercise.  The simple act of stepping behind uke amplifies its martial effectiveness when nage has proper integration of the upper body arm mechanics.  We will reserve a deeper explanation as kuden for the classroom.

As a progression exercise we then moved to uchi-kaiten nage.  The flow progression results from the “what if” questioning (which I encourage all students to do – always question!).  If nage attempts irimi nage direct and uke is able to block the entry, they will only be able to do so by creating an opening (tsuki) on the low gate.  Which is to say, nage has advanced in and up with the fingers toward uke.  Uke has maintained connection and stopped nage’s advance.  There is now an arc created by both player’s arms and nage must step through that opening and snappily turn their hips while simultaneously cutting the grasped hand down.  (From a pedagogical progression, the step before uchi-kaiten- nage, is kokyu-nage.)  If uke breaks connection as nage cuts precipitously down, then the throw is called kokyu-nage.  If uke maintains connection, then nage must pick up control of uke’s lowered head, keep it down and lever the arm across uke’s back for kaiten-nage.  Think on this progression and feel the rolling action of that ball-joint connection.  That ball joint must flow – your goal is to have it feel well-greased and not forcibly move it through space.  Play with a gyroscope.  Get it spinning and then roll it in your hand as you move through space.  It wants to resist your motion.  With a similar idea, you want to transmit as little force/information through that connection with your partner lest they resist you.

This is the higher art: manipulation through connection.

______________________

Beyond Horizon

[1] Respect:  to quote Robert Heinlein, “An armed society is a polite society.  Manners are good when on may have to back up his acts with his life” (Beyond This Horizon, 1942). Humility should result from two deep lessons: there is always someone better than you and you will never know who that person is.  Therefore treat everyone with respect (circumspect).  Less cynically: the encounters we set up in Aikido are derivative from weapon based engagements.  Treat all encounters as if they were armed engagements.

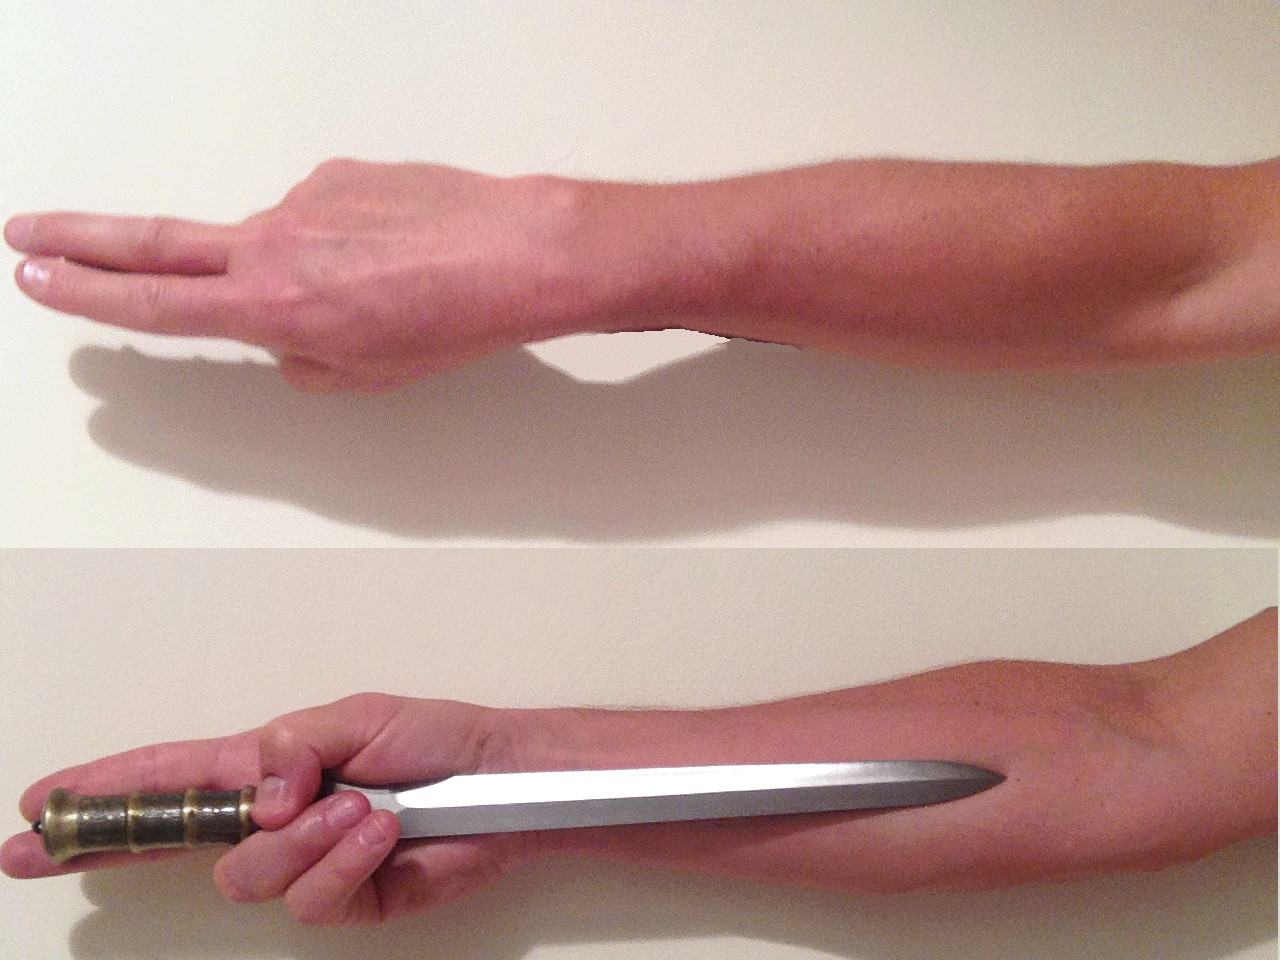
[2] There are any number of deadly variants, some of which are contingent on the weapon used.  In class I showed some basic concepts that are not paramount to Aikido’s focus on connection but should inform your understanding of the movement.  When the blade is held fore-grip, start by (1) breaking plane – when uke grasps the weapon hand to control, immediately flick the blade off-line (to the outside) then snap your elbow down and immediately bring the point back to center.  This will cause uke to pitch themselves onto the point (usually with their soft palate); (2) the move up the centerline from low to high could be a stab (a #5 at any level) or can skid up the sternum to the neck then over to hook behind uke’s head.  If done with the blade in reverse-grip (or with a karambit), (1) breaking plane is an immediate attack to the flexor-tendons (uke’s forearm interior), and (2) the rising line to the neck for a traditional irimi-nage is a continuous contouring cut.  I also showed that the knife in reverse-grip could just as easily be elbow strikes (we are just moving up one joint as the impact point: from hand/wrist with a weapon to the elbow without).  Panatukan concepts should inform the close quarter interpretation of these movement patterns.

BONE LOCKING

Aihanmi katate dori irimi tenkan is generalized to the R/R, L/L relationship: a cross hand grab. The grab starts from the premise of an opponent approaching with the same dominate hand. Think weapons – this is a quick flow entry, with a cut over lead then passing to the outside line (kiri kaeshi).

The kihon exercise is your key to understanding the concept.

From the cross-hand index – the grasped hand cuts over uke’s grabbing hand with a circular dissolve that targets uke’s forward leg. Put a weapon in your grasped hand to understand the budo. Freeing your grasped hand will simultaneously put uke’s forward hand back toward their center line. You have passed to the outside line. This is the higher concept – see the lines of entry. The irimi entry gains position and the snap turn of the feet allows the replacement of nage’s back hand to control uke. With the tenkan, nage now controls uke in a gyaku hanmi relationship (R/L, L/R indexing).

Understand this as a concept and its potential expands.

Kihon level – as typically taught, from contact, one learns the escape from a grasp. Nage learns the bio-mechanics of the release: present the palm angled up – providing uke the thicker part of the wrist to grasp. Then employ rokyu-kokyu action to begin the cut-over:  Pull your thumb toward your center which pushes the base of your palm forward, allowing the shyuto (lead by the little finger) to lift vertical, then over and down to execute the cut-over. The action is limited to the hand at this level with the elbow and shoulder relaxed to avoid the temptation to use strength or greater range of motion to effect the release.

Circular dissolve – from motion, the action of the release must still happen but the conical action that starts at your fingers now continues to articulate the forearm. In a sword action this is a dissolve into a thrust. With this understanding uke is advancing with a mid-level (chudan) attack – not simply trying to grab your wrist. This is now a dynamic rather than static encounter. Uke attacks and nage executes a circular parry-riposte and then a passing turn. Find the cognates in Maistre Selberg’s fencing as well as Master Keating’s djurus.

Replacement – after effecting the escape, dissolve, to then make the turning pass (tenkan) a controlling contact, then nage must change hands at the point of contact – changing the relationship from ai-hanmi to gyaku-hanmi. To make this change deftly nage needs have a clear point of contact (the axis of the encounter) and must know how to break plane to transfer weight down without using shoulder strength. Tanren geiko – train to deploy weight, breath and balance: keep yours to disrupt your opponent’s. Hand replacement is a two-beat entry and therefore requires greater skill than our opponent: nage must execute two moves in a given time span to uke’s one action. This can only be accomplished by (1) being faster – i.e., executing moves quicker (2) using atemi – a hit that effectively buys you time (3) having a superior understanding of time and tempo: in short being more skilled because nage is either ahead of or breaks uke’s OODA loop.

While in this development sequence hand replacement is used to keep contact and gain positional advantage (nage has moved parallel to but slightly behind uke’s flank), a direct entry will use hand replacement to climb to uke’s line. Think chain boxing or limb destruction to reach uke’s highline. Techniques that could employ this direct replacement – aihanmi irimi nage (direct) and kokyuho (direct).

Belaboring the basic exercise is important because all subsequent actions are predicated on nage having achieved the entry. By being parallel and outside uke’s original line, nage now has two hand available to uke’s one. Therefore, exploit the advantage through bone-locking.

Bone lock.jpg
Firm control

Bone-locking is intentionally dramatic label for the joint control that must happen once nage achieves position at uke’s flank. Given an original RvR contact, nage extracts, dissolves, enters and passes to achieve a RvL replacement at the axis. At a very high level, controlling the axis (the point connection) is the goal. For this lesson, we are focused on the bio-mechanics of control. By momentarily controlling the axis with the left hand, nage uses his right hand to regain control of uke’s right hand. Grasping uke’s hand from the top, nage envelopes uke’s thumb and with rotational force starts a twisting lock that should compress the small bones of the hand, then the wrist which will compel uke’s elbow to rotate parallel to the ground pointing toward uke’s centerline. This will cause uke’s hip to cant toward nage. Small bones leading to large bones in sequential locking control. At the higher levels of blending, nage achieves this enhanced positional advantage through ‘invitation’ which is a leading action that causes uke to move past their intended position: truly superior time.

From the lock any number of techniques or options present themselves. With nage in the R/R or L/L position, the opposite hand is free to execute kokyu-ho. The geometry of the entry is a strike – the free hand executes a punch to the jaw to snap uke’s head to the side (along the opposite vector of uke’s locked arm). Nage then enters for the throw by following the strike which is delivered along the tangent of the circle. Furthermore, as a breath-throw, kokyu-ho requires that the breath be pressed low into the abdomen so that the abdominals are muscularly engaged during the throw. Nage remains on the exterior line for this option.

Decrease the levers and locks by making this a sword technique and the blade capture, passing raise to a flowing jodan cut and the power of kokyu-ho becomes dramatic.

But the compelling action to focus on for this investigation is the bone-lock where uke’s arm is at chudan level. Kokyu-ho is outside line, high gate (nage’s arm goes over the trapped arm). Udekimi-nage is outside line, low gate (nage’s arm goes under the trapped arm). Shihonage is outside line to inside line, low gate. Irimi-nage can be done on either the outside line or as a split entry. Moving both hands under the low gate, one can slip to grasp the back of uke’s head (kubishimi) for a gravity throw – this can be done as a split entry or a double inside. Another alternate is to slide the lower body in simultaneously as koshinage. Many possible responses from a simple entry.

From one thing, know ten thousand things, M.M.

DAGGERS

What immortal hand or eye / Could frame thy fearful symmetry?

William Blake was writing about a tiger (tyger) but we are speaking of daggers. The dagger is made with a fearful purpose and a beautiful symmetry.

The dagger is defined by its symmetry around the long axis and by its emphasis on the point over the edge. Daggers have two points, the point of the blade and the butt of the hilt. Edges are secondary. Where a knife is a multi-purpose tool, a dagger is a weapon. There is no disguising its lethal intent.

Examples of modern daggers

fairbairn knife
Sykes-Fairbairn

The Sykes-Fairbairn stiletto inspired the V-42 (of the Devil’s Brigade) and the Gerber Mark series that won fame during the Vietnam war.

tai pan.jpg
Cold Steel Tai Pan

Modern daggers with sharpened edges in contrast with historical rondels that were often spikes to slip between armored joints of a downed knight: the mercy-kill or misericord [Middle English, pity, from Old French, from Latin misericordia, from misericors, misericord-, merciful : miserērī, to feel pity; + cor, cord-, heart].

Starting with an historical review – Fiore’s manuals are well presented >here< and include nice dagger plays (and there are more links in the Sykes-Fairbairn post).

Moving to modern interpretations, the dagger is reserved for the silent killers. The OSS and later ‘special forces’ used the dagger because it is an entry device – not a multi-purpose survival tool like a knife.

sentry removal.jpg
Keep it quiet

The dagger was designed for efficient killing and killers have long recognized the primacy of the point over the edge. The edge vs point debate, I suspect, will never have a decisive conclusion. Both the Styers and Fairbairn methods have been covered previously and it should be evident from reviewing the history and manuals that there is a marked difference between a fighting system and the killing techniques. It isn’t that one is better than the other as much as the purposes are different and therefore the design of the blade is as different as its use.[1] Each has its purpose and we should understand and appreciate those differences.

Master Keating recently reviewed the basics of double dagger plays.

Always know the laws pertaining to the legality of daggers (for they are reviled in many states)

A dagger has a time advantage in knife play. Because it has two live edges, the dagger does not need to turn the live edge to make an angle change, a timing advantage of a half beat or more when playing a game of malicious deceptions.

The dagger disappears more readily than the knife when aligned with the central vision blind spot – its symmetry makes it harder to perceive.[2]

Some unique features of a dagger: When held in a foil grip (thumb hidden by the blade), the flat of the tip is toward the opponent rather than the edge. A ‘popping’ hit will therefore leave a distinctive ^ shape cut. This presentation of the blade can also be used to ‘strum’ the ribs which reportedly creates exquisite pain without severe damage (no organs punctured).

Like all knife plays – mental attitude is primary. We train to be bold! You cannot fear the cut and blade familiarity is a must. Dexterity drills – knife twirling and manipulation is a prerequisite and a means to learn the weapon.

Every elbow technique is the dagger held in reverse (ice pick) grip. Study that and think again about the implications of elbow shields.

The dagger is about points: daggers have two: The blade has a point, but so does the butt which was often formalized as a skull crusher – the use of the punyo.

horiz
The 8 planes

Because daggers are tools of destruction think again about the area of combat – when your life is in jeopardy the geometry is the circle. Destreza – Carranza and the famous circle. The Arena, the bull ring, and the original boxing ring wasn’t a square: the dance of death is not played on a strip, hunters seek the flank and wary prey avoids – circling.

o sensei diagram
Others have seen this too

As we circle the feet must be light with the balance closer to the heel as in fencing. With the weight on the ball of the foot the move is already committed and the knife requires increased mobility. When the weight moves to the ball of the foot, then there is no further range to achieve. Of course one must stay light. When examining the foot print of a fighter, if the heel print was too deep, a master knew that the duel would be short – the inexperienced fighter would be hampered by a heavy gait. A knife fighter does not walk directly, he circles in. 

_______________________

RESOURCES

Visual context Italian Italian knife fighting

Filipino curriculum

Ray Floro – Floating heel – rock back – light heel – a deep heel print means death.  Need to glide.

The Piper Knife fighting method.

_______________________

GRIPS

Foil grip, the V42 has thumb grooves above the guard specifically for this grip (see picture above). Thump on the flat, backside of blade. Flick it, pop it at targets – leaves nasty triangular, punctures. Rake it down the rib cage, strum the ribs – old OSS interrogation method on Nazis.

Reverse grip – thumb caps the end. Dagger held flat side toward adversary. Same flicking action. The dagger pulls the body.

_______________________

EXERCISES

6-Part Dexterity Drills – This is the rotation of a blade on the horizontal and vertical planes. Allows for quick grip adjustments as well as attacks. Be able to do this will all blades. Do with a blade in both hands.

NOTE: Master Keating prefers his right hand grip to be foil or standard grip, his left hand is in reverse grip.

Guard – Point the dagger at the eyes – It is a promise of death – this basic guard will back most down.

Solo practice – dagger in foil grip – drop the butt down onto an imaginary thrust, then up.

Parry outside, dexterity drill and stab. Repeat on the other side of your body.

Dagger in hammer grip – fan back and forth to understand defense on the right side, the front, the left side.

o   Pole (jo) and tea cup drill – move the jo like the tea cup drill and find where and how you would slash with the dagger.  Start with one dagger, add the second.  Figure out how to control the jo.  Move it outside in and the other direction.  Learn how to “lose your hands,” learn to cradle – these are traps. Thumbs, wings, the pockets of the body.

o   Cloudy hands – both hands moving inside-out, outside-in circles, “wax-on, wax off” motions with daggers. Start by emphasizing just the points and move to complete articulation of the daggers. Walk with them and feel the body begin to move with them.  Your body will want to turn. This becomes a form of “shadow boxing.” Count the number of hits on yourself. Teaches split coordination, multi-tasking. Double dagger is doing many things at once – working timing and split coordination. Stay relaxed. 

Solo exercises: dagger held in reverse grip – hidden

hidden dagger
Hide your skill

First: Flick the point up the ocular cone toward your opponent’s eyes. Allow the dagger to pull your body forward in true time: weapon, hand, body, foot. Snap to return.

Second: on the horizontal plane, double cut – forward, reverse, then stab

Third: as in second but on the vertical axis.

Fourth: strike with the butt, retract with the point on the outside of the forearm (nails away), then repeat but return with the blade on the inside line (nails toward face) to strike forward then behind.

Fifth: fish tail the knife – warding/harassing cuts. Three quick wags of the blade to the side, middle, opposite side.

Partner exercises.

First: Traditional thrusting triangle – tap (one dagger only) but remember the pull cut on the retreat. Perform all matrix combinations (R/R, R/L, L,L and foregrip, reverse, one foregrip, one reverse).

o   Start tippity tap on only one line until partners become efficient. Progression training at its finest – Move to include all three lines – the 5, the 6, the 7. Incorporate dexterity drills. Do right vs right. Do right vs left. Do left vs. left. Don’t forget the cuts that the Kali triangle exposes. There are takeways as well. As partners start to get comfortable with the patterns, they will begin to move and cover space.

o   Double dagger drill – Feed 6 and/or 7 drill. Start with cover and slash = foundation.  Can add pikiti tersa pass later. One partner feeds a 6. The other partner receives this with the left-handed dagger in reverse grip. Execute an outside-in intercept that forces the 6 down to the right-hand dagger in standard grip (grips can vary, experiment!). The right-hand dagger can be moving up like a roofing action and cut under the incoming 6 hand. Then, return your right hand along the 6 line so your partner can practice.

o   The 7 line feed allows the other partner to receive with the right-hand dagger. Execute an outside-in intercept that forces the 7 down to the left-hand dagger in reverse grip. Pass the dagger above the incoming 7 and return your own 7.

o   For any of the above, the point is to experiment. You can receive with either hand and feed to the other. Moving your body off the line may help to see what is logical.

Second: sinawali done foregrip and then reverse grip.

Third: Cloudy hands, stir with the knife, reverse and flat (point forward) variations.

Solo double dagger exercises.

Tea cup: using a pole (jo) to augment double dagger training. Replicate the actions of a scissor attack to an extended limb (or neck).

Shot glass: pass the shot glass from tip to tip – spearing it smoothly from one to the other to practice the point. Use the flat to pass playing cards.

5 Double Dagger Katas

#1 “Priest Dive.” Starting double daggers hidden – double strike up the ocular cone (priest method), double roll out, double lift (punyo strike/drop), then double strike to the chest.

This is the Generic opening for all – Both daggers – butts out, points toward you.  Both hands execute outside dissolves.  Bring both daggers up and bring down into opponent.

#2 – Generic opening – right arm up, reverse, sweep leg

#3 – Kokyu Ho

#4 – Daggers in clavicles

#5 – Side sinawali

double tap from inside / outside = forehand and back hand as auxiliary skill

trick – lop sao exercise tile head into notch of throat

Prayer entry – Snake A – stay on outside / snake B come to close (clap)

Disarms – make the man eat his dagger.  Against a straight R thrust.  Slap L feed R, then clasp you hands at opponent’s elbow to feed back

Combat tricks. Even a fast strike can be caught by the opponent – we have good hand-eye coordination.  To defeat that strike with broken rhythm – on the descent, waggle the blade, this will draw the opponent’s attempt to block or catch the strike early.  Then continue the strike to its target with impunity.

Auxiliary Skills to Help Dominate – this is not about exchanging blows.

Double tap drill – yokomen like strike is delivered.  Partner, on the inside line, taps with one hand, taps with the other and returns either a palm up or palm down judo-like chop.  Flow drill.

Control technique – one hand to the back of the head, the other hand – two fingers into and down the throat.  Tilt their head forward.

Dagger disarms = Winding disarms – Kali stick disarms – Snake A and Snake B

Salute system – for inside and outside lines.  Combine with the double tap drill.  Hammer and anvil the bicep and judo chop to the face.  Partner receives the chop and double taps and feeds you.  You repeat one salute to get to the outside line, a second salute with the other arm brings your elbow up into their tricep.  Then, same arm cups the tricep you just hit and becomes the “anvil” for the third elbow you are about to deliver to the bicep.

Scarf – Kerchief defenses

Disarms – Take and keep, project/eject, returns, discards.  How many do you know?

Return punch – punch comes in. Tenkan.  One arm over, one under.  Lock hands.  Tenkan back to front and scissor.

Canon punch – Shoulder and forearm form a “v” at the elbow.  Palm is up and back of fist is parallel to the ground.

Piper System from Africa – flurry side to side and then hit.  Fakes.

Card passing on blades.  Point control with a shot glass.

Stool Drill – Four leg Panchar – traditional silat entry —-  + drill – teaches sweeping and locking.

Elbow shields – think about these and how they work with double daggers

Defense against kicks – kick comes in.  Catch kick in the bend behind your knee….basically raise your heel to your butt, catch kick and draw knife and stab knee.  A kick to the shin, simply raise front leg relaxed, stab kicking leg.

Get a Mental Advantage

Theatrics matter – Fake an injury – set the stage for deception.

Ritual taunts to create doubt in the mind of the opponent. Verbal commands add power and put the opponent in a different state of being. Insults – Basically, talk shit.  Plant the seed of doubt.

Verbal commands – speak tactically, be relaxed.

Verbal leads to create misdirection. “I am going to kick you in the balls,” but punch in the face.

Laugh in the face of death, it lightens the spirit.  Reverse any energy drop. The deadlier the ground, the need for a lighter spirit.  Feel up the spirit.  Relax, not tense.

To steel your nerves and counter an opponent’s verbal power.  Laugh.  Don’t dissolve with fear – sardonic laughter re-sets your internal polarity.  The deadlier the ground, the lighter the spirit must be – so relax: you are going to die anyway so be light-hearted.

Your spirit precedes you – it is your advance team.

Instill terror to command: be brutal, be quick.

The double dagger emphasizes that in Kali there is no defense, only attack.

The ribs are the spear to the heart – ie you break the rib then push the broken rib into the heart.

___________

[1] The Gurkha sentry elimination technique gives primacy to the edge because the kukuri is a heavy blade – decapitation works equally effectively when done correctly. Read broadly about the Nepali Gurkha and you will be rewarded with incredible stories of valor. Or enjoy a classic movie The Man Who Would Be King (Sean Connery, Michael Cain in the same movie!) to see Saeed Jaffrey as Billy Fish – a warrior to the very end.

___________

[2] Our binocular vision puts us firmly in the class of predator. We are not polite hairless apes constantly worried about our flanks. We need focus on the prey we stalk to gauge its distance and keep it in our sights. Binocular vision also means we have a hard time tracking something coming for us ‘right between the eyes.’ Exploit and be wary of that physiological limitation. In addition we all have a retinal blind spot:

  1. On a piece of paper, make a small dot with a black marker.
  2. About six to eight inches to the right of the dot, make a small plus sign (+).
  3. With your right eye closed, hold the paper about 20 inches away from you.
  4. Focus on the plus sign with your left eye, and slowly bring the paper closer while still looking at the plus sign.

_____________

The dagger as athame: a magic talisman.  Iron commands spirits.